
Contents:
Every blog post we write starts with a real story—usually something we’ve run into ourselves or heard from customers who use our product every day. This one started with a simple but frequent request: “Can you make working with InDesign easier?”
If you’ve ever managed visual content in a DAM, you know how valuable good integration is. And when it comes to Adobe tools, especially InDesign, that need comes up again and again. We heard it in support chats, in demo calls, and in feedback surveys. So when our team began building a full-scale InDesign plugin for Pics.io, we knew exactly what problem we were trying to solve.
One thing that kept popping up? Packaging.
If you use InDesign regularly, you’ve probably heard a colleague say, “Just send me the InDesign package.” Or maybe you’ve said it yourself. In the design and print world, it’s one of those phrases that gets tossed around all the time—but if you’re new to it, or if you’ve been doing it the same way for years, it’s worth revisiting what packaging actually means.
In simple terms, packaging in InDesign means gathering all the pieces of your project—fonts, images, source files—and wrapping them up in one tidy folder. It’s what you do before sending something to print, handing a file off to a teammate, or saving a finished project for the archive.
In this post, I’ll walk you through what’s included in an InDesign package, when and why you should use it, and how to do it step by step. And if you’re looking for a faster, less manual way to prep your files, I’ll also show you how we’ve made this process smoother with the Pics.io InDesign Plugin.
| Method | What It Is | Pros | Cons | Best For |
|---|---|---|---|---|
| Pics.io InDesign Plugin | Plugin that connects your InDesign workspace directly to your DAM library. |
- Pulls assets directly from your DAM - No missing links - Save packaged files back to DAM - Less manual work |
- Requires Pics.io account - Works best if your team already uses DAM |
Fast, reliable packaging inside a connected asset system |
| InDesign’s “Package” Command | Built-in feature (File → Package) that gathers all assets into a folder. |
- Simple and familiar - Works without extra tools |
- Needs manual link checks - Missing fonts or broken links often go unnoticed |
Everyday use for individual designers |
| Manual Packaging | Manually gather fonts, graphics, INDD, and export to PDF. | - Total control over what’s included |
- Very time-consuming - Easy to miss a file or use outdated assets |
One-off projects or custom packaging needs |
| Using Scripts or Extensions | Third-party scripts or plugins that help automate parts of the packaging. |
- Can automate some steps - May offer extra export options |
- Requires setup and testing - Not all are maintained or reliable |
Advanced users looking to customize the flow |
What’s Included in an InDesign Package
Before we jump into the how-to, let’s take a second to talk about what an InDesign package actually is—and why it matters.
When you go to File → Package (or use the older term “collect for output” in InDesign), you’re telling the app: “Hey, gather everything this project needs so it won’t fall apart when someone else opens it.” And InDesign does exactly that. It pulls together all the moving parts—fonts, images, source files—into one neatly organized folder.
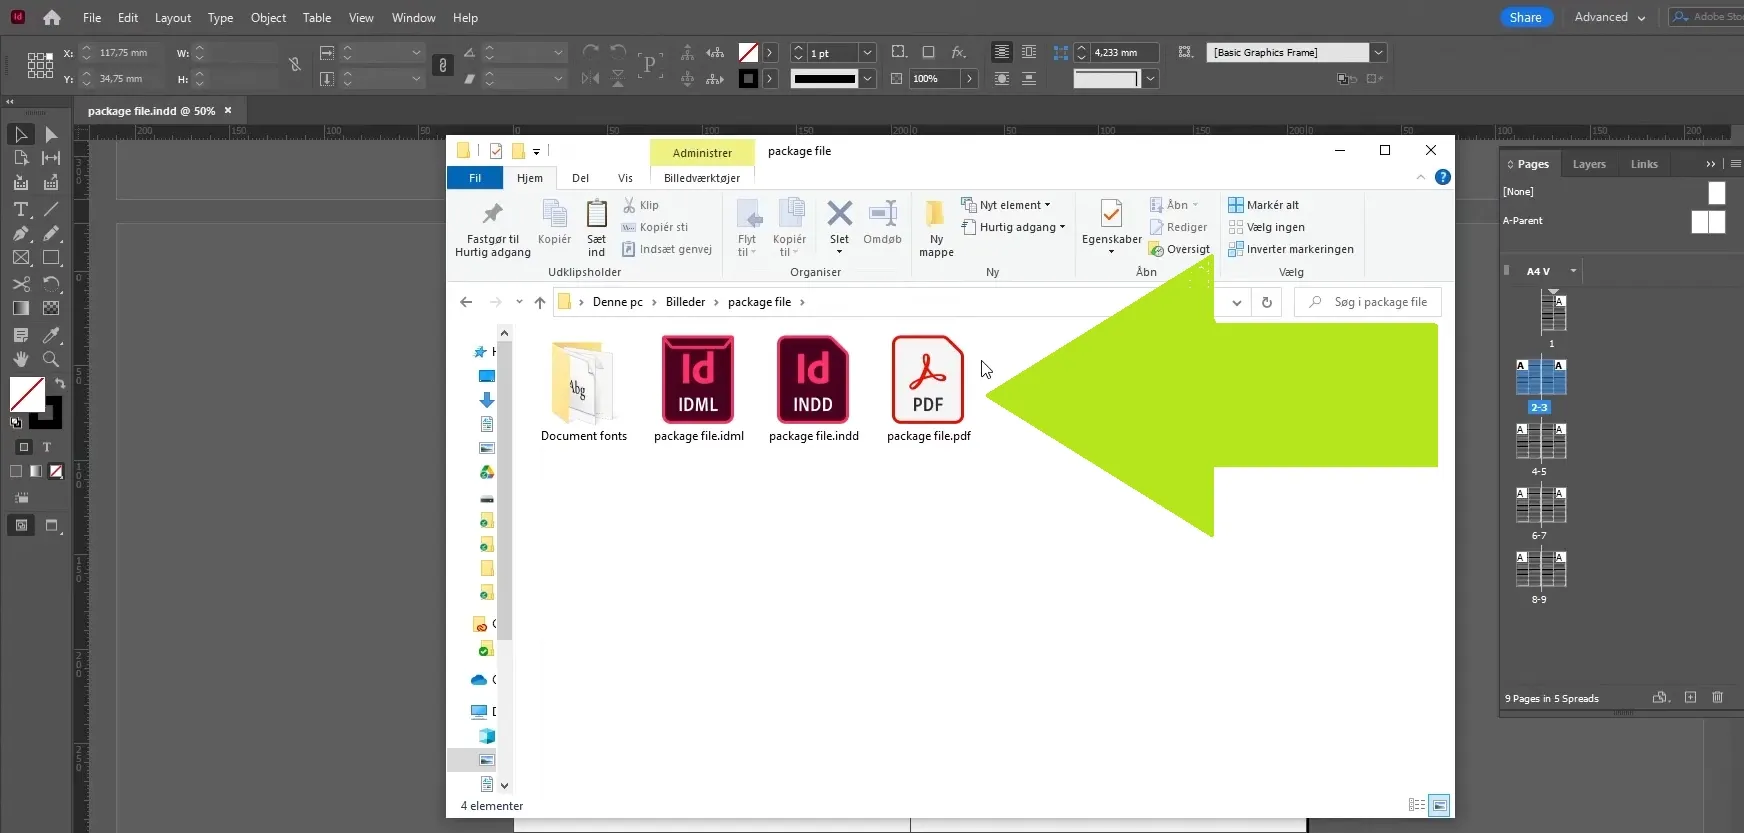
Here’s what you’ll typically find inside an InDesign package file:
- All fonts used in the document
- Linked graphics like photos, icons, logos
- The original .INDD file (your editable project)
- An .IDML version (so it can be opened in older InDesign versions)
- A PDF for review or printing
- An instruction file—often a simple .txt note with print or usage guidance
So why is this important?
Well, if you’ve ever opened a file only to be greeted by missing fonts, broken image links, or layout shifts, you know how frustrating that can be. Packaging avoids all of that. It creates a single source of truth—a folder where everything your project depends on is safely stored.
If you’re sending a file to print, this step is non-negotiable. Printers rely on accurate fonts and high-resolution images to get your work on paper exactly as it looks on screen. If you’re handing a project off to a teammate, packaging makes sure they don’t have to go hunting down missing files or guessing what fonts you used. And if you’re archiving your work for later, it’s peace of mind that nothing will be lost or outdated.
Bottom line? Packaging is how you protect the integrity of your design. Whether you're prepping for print, sharing a project, or just future-proofing your files, using the collect for output InDesign function is a habit worth building.
What’s the Difference Between INDD, IDML, and PDF?
When you package an InDesign file, you’ll notice it doesn’t just grab your working file and images—it also includes a few different file formats. If you’ve ever wondered why that is, let me break it down.
- .INDD — Your main InDesign file
This is your original, editable document. It’s what you open when you’re actively working on a project. If you’ve laid out pages, styled text, or placed images, it’s all saved here. Think of the INDD file as your “live” version—the one where changes happen.
- .IDML — For backward compatibility
Now here’s where it gets interesting. The IDML (InDesign Markup Language) file is like a time machine. It lets someone open your design even if they’re using an older version of InDesign.
Why include an IDML file? Because not everyone updates their software on the same schedule. If you’re sending files to a client, printer, or teammate, the IDML gives you a safety net so they can still open and work with your design—no errors, no format issues.
- .PDF — For preview or print
Last but not least, the PDF is your visual reference. It shows exactly how your document is supposed to look—fonts, layout, spacing, everything. This is the version you’d usually send to clients for approval or to the print shop as a reference. Even if someone doesn’t have InDesign, they can still open the PDF and see your work as intended.
When (and How) to Package an InDesign File
If you’ve ever wondered how to package an InDesign file the right way, here’s the thing: it’s not just about clicking File → Package and calling it a day. Good packaging starts with good preparation—because nothing ruins a handoff or a print job faster than missing fonts or broken image links.
So… when should you package an InDesign file?
- If you're working solo on a quick draft, you might not need it. But in most real-world scenarios, packaging is a must. Here's when to make it part of your workflow:
- Before sending your design to a print shop – so they have everything needed to print exactly what you envisioned
- When sharing your project with another designer – to avoid the dreaded “missing font” and “missing link” errors
- For archiving and future-proofing your work – because six months from now, you might not remember where that one photo came from
In short, packaging is how you keep your file complete, portable, and problem-free—no matter who opens it or when.
Before You Package: Your 3-Step Checklist
Now that we’ve covered the when, let’s talk about the how. Before you even hit the packaging button, take a few quick steps to clean things up and avoid surprises later.
- Check Your Fonts
Missing fonts can throw off your whole layout. To check, go to Type → Find/Replace Font. If anything's missing, either install the font or swap it out with something available. Better now than when your teammate calls you in a panic.
- Update Your Linked Graphics
Open the Links panel. Any yellow or red warning icons? That’s InDesign telling you something’s broken. Relink those files so everything is fresh and connected. You don’t want low-res placeholders sneaking into your print-ready file.
- Run a Preflight Check
This is your safety net. Go to Window → Output → Preflight and scan for issues like low-resolution images, overset text, RGB colors in a CMYK doc, and so on. It only takes a minute—and it might save you hours of fixing later.
Step-by-Step Guide: How to Package an InDesign File
So you’ve checked your fonts, updated your links, and run a preflight. Now it’s time to package the file. Here's how to do it properly—without missing a beat.
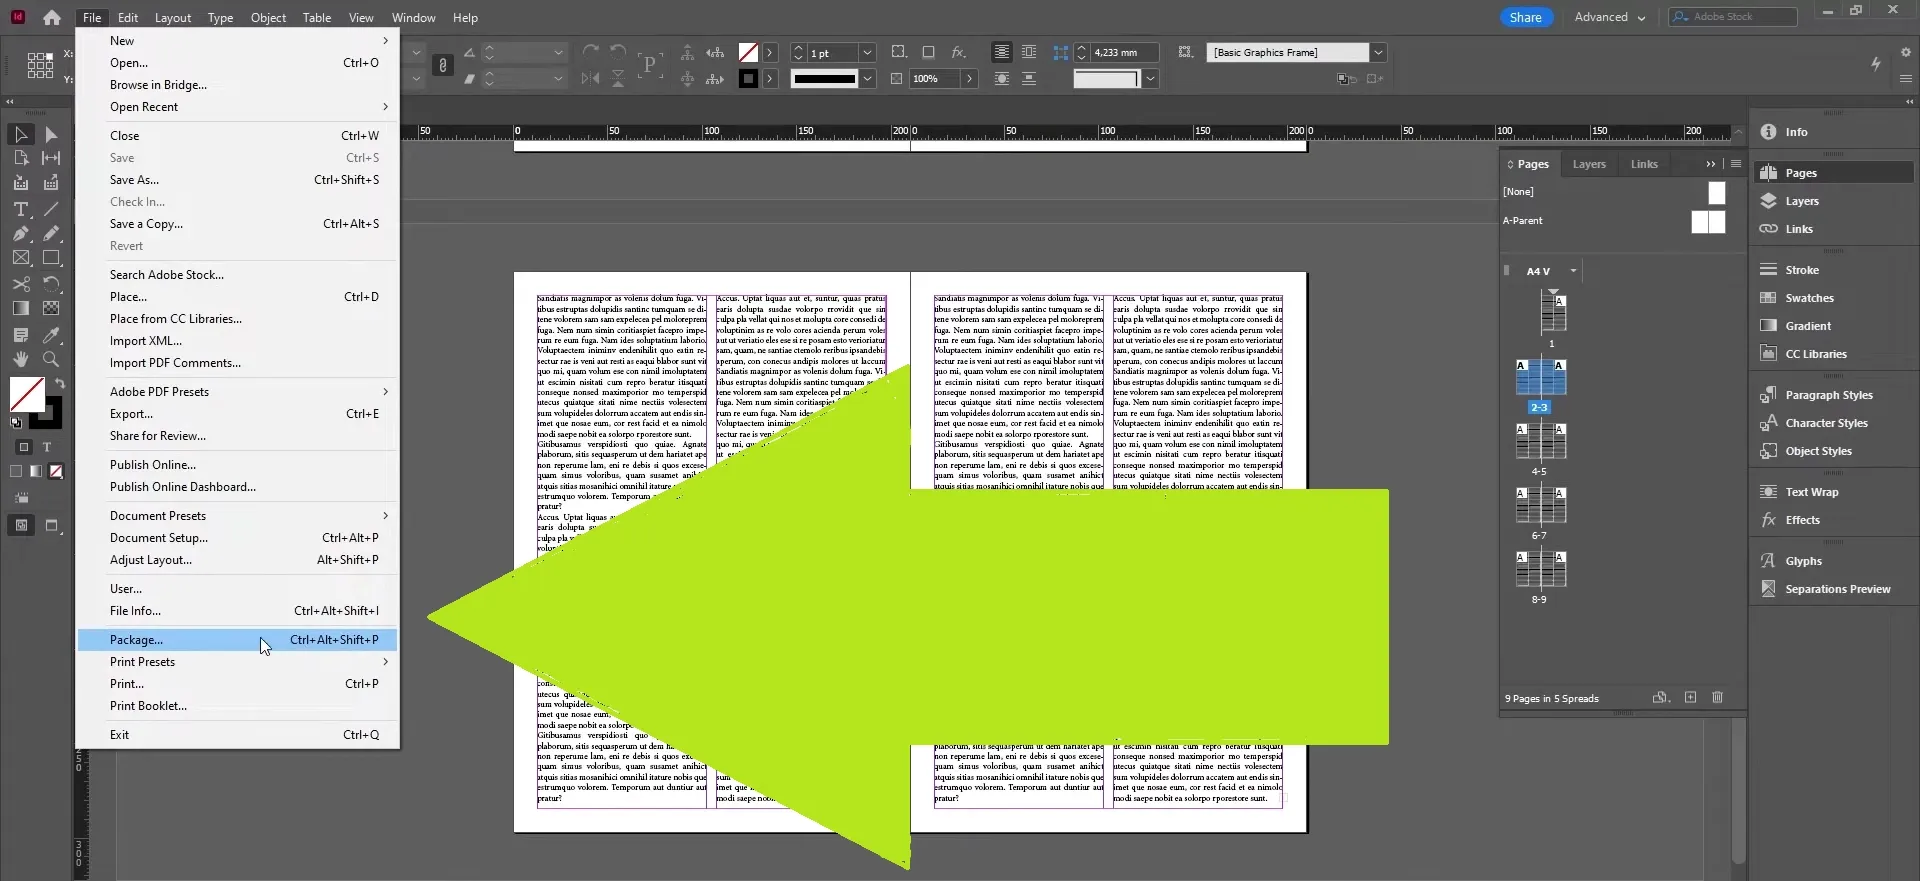
- Step 1: Go to File → Package
This is where it all begins. When you choose File → Package, InDesign gets to work gathering everything your document depends on—fonts, images, styles, and more. Think of it like packing a suitcase for your project: you're making sure nothing gets left behind.
- Step 2: Review the Preflight Summary
Before you move forward, InDesign will display a summary of any technical issues. These might include missing fonts, broken links, overset text, or incorrect color profiles.
It’s worth taking this moment seriously—fixing small issues now can save hours of back-and-forth later, especially if the file is going to print.
- Step 3: Choose What to Include in the Package
InDesign gives you several options. Here’s what you should typically select:
- Include Fonts – So the text renders exactly as intended, even on someone else’s machine
- Include Linked Graphics – All your placed images and logos go with the file
- Include IDML – A more flexible file format, especially useful if the recipient uses an older version of InDesign
- Include PDF (Print or Interactive) – A visual reference for review, proofing, or prepress
In most cases, it’s best to include all of the above—this gives your recipient everything they need, whether they’re editing, printing, or just reviewing.
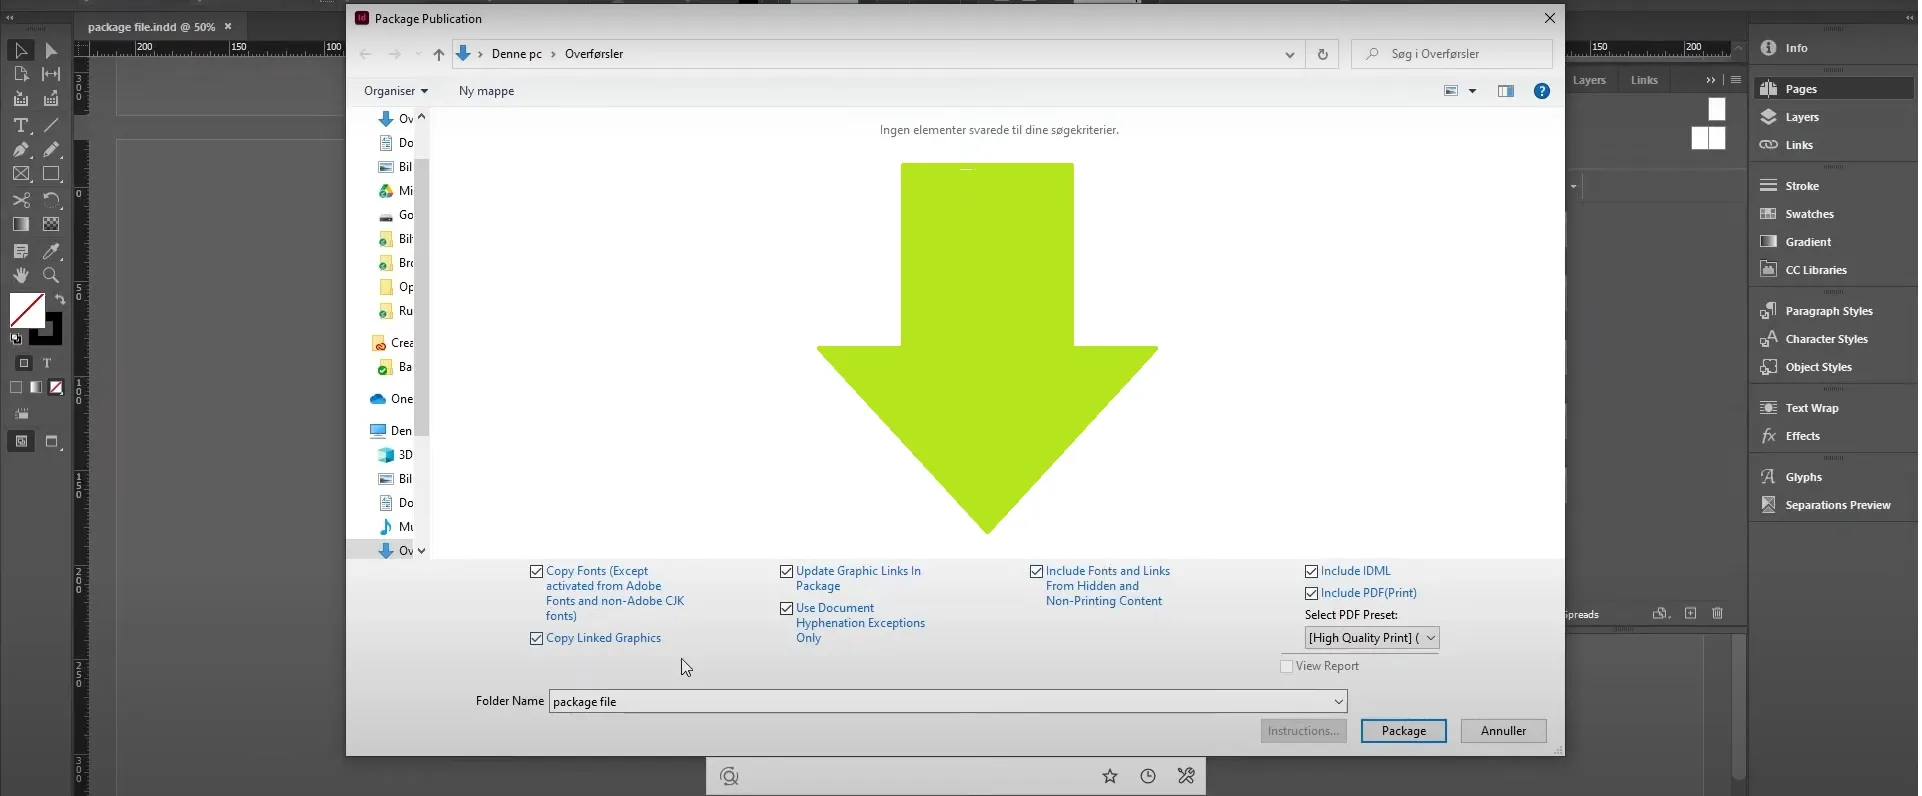
- Step 4: Add Instructions (If Needed)
If the file is headed to a printer, you can add a text file with specifications—things like bleed size, paper type, print quantity, or color handling. InDesign even gives you a box to enter basic notes right in the packaging dialog. Clear instructions now can prevent costly mistakes later.
- Step 5: Save and Organize Your Package Folder
When you hit “Package,” InDesign creates a new folder with all your files neatly sorted. You’ll find subfolders for fonts, links, and the various file versions you selected.
Now’s a good time to compress the folder into a .zip file. Zipping keeps all your files together, avoids accidental edits in transit, and makes it easier to send via email or file-sharing tools.
Speed Things Up with the Pics.io InDesign Plugin
If you’ve ever packaged an InDesign file manually, you know the drill: double-check all your links, hunt down missing images, make sure you’re using the latest version of every asset, then cross your fingers and hope you didn’t forget anything. It’s not exactly the most fun part of the job.
That’s where the Pics.io InDesign Plugin steps in. It’s built to take the pressure off by connecting your InDesign workspace directly to your Pics.io Digital Asset Management (DAM) library. Instead of digging through local folders or asking teammates for the right file version, you’re working with a single, organized source—right inside InDesign.
Here’s what the plugin makes possible:
- Browse and search your entire asset library from within InDesign—no need to switch apps
- Import graphics and images directly into your layout from DAM, with version control baked in
- Avoid broken links because you’re always pulling from a verified, up-to-date source
- Save packaged files back into DAM, so your final work is archived in the same place your team can access it
Think of it like this: instead of managing assets like juggling loose puzzle pieces, the plugin gives you the picture on the box—and the tray to keep them in place.
As an example: a designer working on a product catalog opens InDesign and starts laying out the pages. Instead of emailing the marketing team for updated product shots or digging through shared folders, they search the DAM panel inside InDesign and drag in the latest approved images. When it’s time to package the project, there are no broken links, no outdated versions, no messy surprises. Everything is already in place.
The result? Fewer clicks, fewer headaches, and a packaging process that actually feels manageable—even on a deadline.
If you work with InDesign and manage lots of assets, this is the kind of upgrade you’ll feel right away. And the best part? It keeps your team working in sync—whether you’re across the office or across time zones.
Final Thoughts
If you’ve made it this far, you already know that packaging an InDesign file isn’t just a technical step—it’s a safeguard. It’s what keeps your layout intact when it goes to print, lands in a colleague’s inbox, or gets saved for future use. And if you’ve ever opened a file full of missing fonts and broken links, you know exactly why it matters.
So—how do you package an InDesign file the right way?
You start with a few basics: double-check your fonts, relink your images, and run a quick preflight. Then you use InDesign’s built-in packaging feature to gather all your assets into one clean, organized folder.
That alone can save you from a lot of headaches. But if you want to make the process even more reliable—and a lot less manual—the Pics.io InDesign Plugin takes it further. With direct access to your DAM library inside InDesign, you don’t just package faster—you package smarter. Your assets are already organized, already linked, and already up to date.
Whether you're working solo or as part of a team, this one habit—packaging properly—can make a big difference in how smoothly your design projects run from start to finish.
Did you enjoy this article? Give Pics.io a try — or book a demo with us, and we'll be happy to answer any of your questions.
Author

Akinai is a skilled customer support leader with experience managing teams of more than five members. She holds a Bachelor's degree in International Business and has UX/UI design training, earning second place at RadCode. She consistently advocates for the customer's voice in meetings with top management and other stakeholders.


