
In this article, you’ll learn:
Teamwork is the key to increasing productivity. To properly organize workflows, you should give your entire team access to relevant materials. The best approach is to connect a cloud storage service with flexible access rights settings and convenient file-sharing features. Google Drive is the perfect solution for this task.
The cloud storage market leader offers convenient digital asset management solutions for individuals and businesses. However, not all of its essential features are on the surface and have intuitive use cases. Sometimes, you need to work harder and study manuals to achieve the desired result.
If you want to maximize productivity while working on a project as collaborators, it’s good to be familiar with Google Drive shared permissions best practices. Today, we're going to show you how to create shared Drives, set up access rights, quickly find the materials you need, and use additional tools to improve your workflows.
Best Practices for Google Shared Drive Permissions
First, we need to explain the concept of shared Google Drive. They are separate folders created in business or student accounts. To work with them, you will need a subscription to Google Drive and Google Drive Workspace for business or educational institution. Files in them belong to the entire workgroup rather than to a specific person. Shared Drives have advanced access rights settings compared to My Drive. So, let's see how you can use Shared Drives to get the most out of them.
Create Separate Shared Drives for Each Project or Team
It's always convenient when a folder contains only the materials you need to complete a specific task. Users will look through fewer files to find the information they need and, thus, will spend less time and effort. You can use different principles of organizing shared Drives when creating them for:
- individual projects, for example, for each client, product group, or marketing campaign;
- individual teams, for example, for company divisions or members of senior management who have the highest level of permissions;
- specific groups of digital assets, for example, photos and screenshots, text documents, and sensitive materials containing trade secrets.
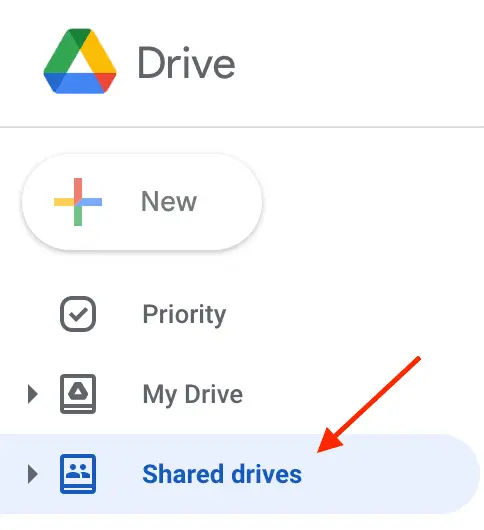
If you want to know how to make a shared drive, check out the following instructions:
- Open your cloud storage in a browser and log in to your account.
- Click Shared Drives in the menu on the top left.
- Click New button.
- Enter the drive name and click Create.
To move files from a personal drive to a shared drive, select them and copy and paste them to the desired folder. You can use the menu that opens by right-clicking the mouse or the keyboard shortcuts Ctrl+C, Ctrl+V. Another option is to drag and drop files onto the shared drive icon.
Set Reasonable Permissions for Users
If you have already studied how to use Google Drive for business, you know that the professional version of the service allows you to choose one of five roles for each participant in the workflow:
- Viewer — can only view folders and files;
- Commenter — has the permission to make suggestions;
- Participant — can create, copy, and download materials, invite other people, and share individual files;
- Content manager — has permission to move and delete materials, as well as to distribute folders;
- Manager — can move materials between Google shared Drives, rename and delete drives, define permissions and roles for each user, and create work groups.
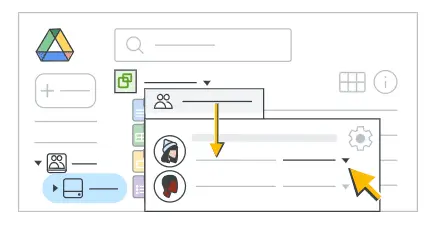
When you create a shared Drive, you automatically become its manager. To invite other project participants and define their roles, follow these simple instructions:
- Go to your drive.
- Click the arrow button next to its title.
- Select Manage Members.
- In the new window, you can search for project members by name or email.
- By default, each added member will have permission to view documents. To change them, click the arrow button next to the role name.
![How to Create A Shared Drive in Google Drive Successfully [Stepwise Guide]](https://storage.ghost.io/c/a6/c3/a6c33836-c363-4350-81d0-0ea9604ed597/content/images/2024/05/image2--2---1-.webp)
Give Access To Work Groups
If you want to know how to share a folder on Google Drive with several thousand users at once, you should learn about the concept of work groups. The Google Group service allows you to group users into teams to give them access to certain materials, tools, subscriptions, and chats with just a few clicks. It is convenient because you don't have to search for each person individually. If you know how to create a shared Drive and a group, you can share content with up to 50,000 people at once, while you can add no more than 600 people individually.
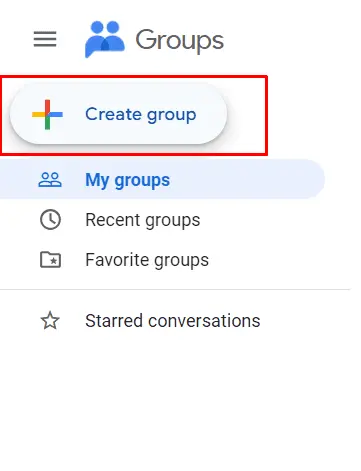
The instructions for creating a group are as follows:
- Go to Google Group service.
- Click Create Group button.
- Choose a name, corporate email, and description for the group.
- Add members the same way as when you share Google Drive — search for them by name or email address.
- Confirm group creation.
Now, you need to figure out how to use Google Drive to share files for a group. Follow the instructions given in the previous step, but instead of the username, start entering the group name. Select it and confirm your actions. In total, you can distribute a share Drive to 100 groups, choosing different permissions for each.
Create File Naming Conventions
The drive name should be a short description that informs the workflow participants about the content. It helps users find the necessary digital assets without wasting time previewing them. To learn how to share Google Drive with someone quickly and accurately, use the following tips:
- Choose a drive name according to its functionality. For example, it could be the name of a company division or a supplier's brand.
- Add prefixes if you need to create many similar disks or folders, such as abbreviated names of regions, years and months, file types, etc.
- If you specify the date in the prefix, use a standardized format, for example, DD-MM-YYYY.
- Indicate the current project status in the prefixes. For example: "planned," "in progress," "completed," "archived," etc.
- If necessary, add a prefix with the rules for how to access Google Drive, such as "for external distribution," "within the company," "for management only," etc.
Provide additional training to employees on the file naming policy for shared drives. If necessary, introduce motivation and demotivation methods, such as bonuses, fines, individual incentives, etc. If you change your digital asset management policy, conduct training sessions and make sure you communicate the changes to all stakeholders.
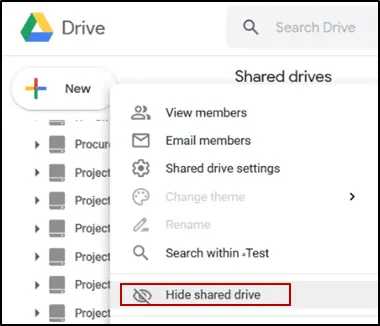
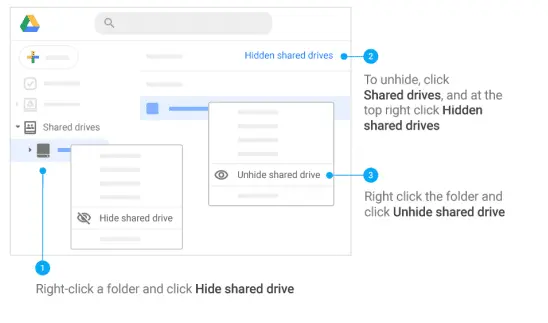
Hide Unnecessary Shared Drives
If you don't plan to use a particular drive in the near future, you can simply hide it to simplify the search for the data you need. To do this, go to Shared Drives section, find the drive you need, right-click on its icon, and select Hide. You can also select multiple drives at once by pressing the Ctrl key on your keyboard.
Please note that shared drives are automatically hidden if more than 2,500 participants are added to them or if one of the groups has more than 1,000 users. This helps to avoid sending spammy messages about changes to digital assets.
If you want to know how to share files on Google Drive that were previously hidden, go back to Shared Drives section. Find Hidden Shared Drives button at the top and click it. Select the drive you wish to share from the list, right-click on its icon, and select Unhide.
You can also search for shared drives (including hidden ones) by the creator's name or email address. To do this, go to the Shared Drives section and enter creator:[name] in the search box, for example, creator: Alex A or creator:alexaa@workaccount.com.
Choose The Right Shared Drive Settings
It is crucial to know how to share a file on Google Drive and restrict its transfer to other people beyond work processes. To choose the best rules for sharing information, use the following instructions:
- Go to Shared Drives section.
- Select the drive you need and click the arrow button next to its name.
- Select Settings.
- Carefully read the access rules and disable unnecessary ones.
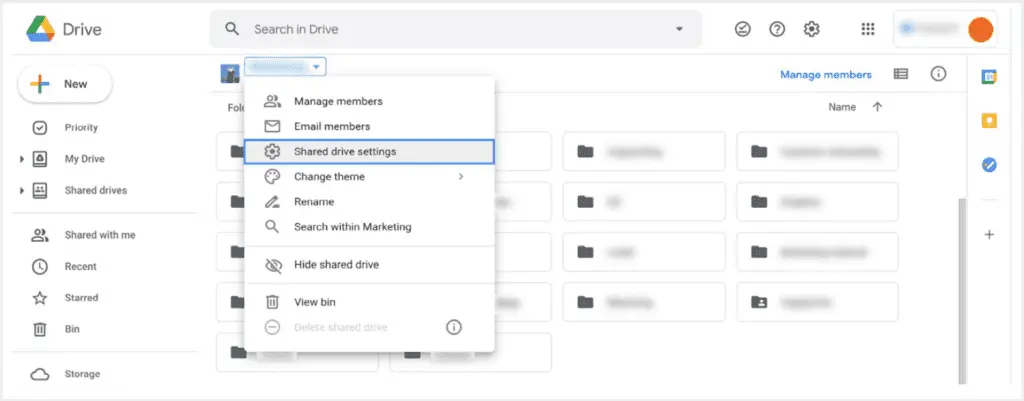
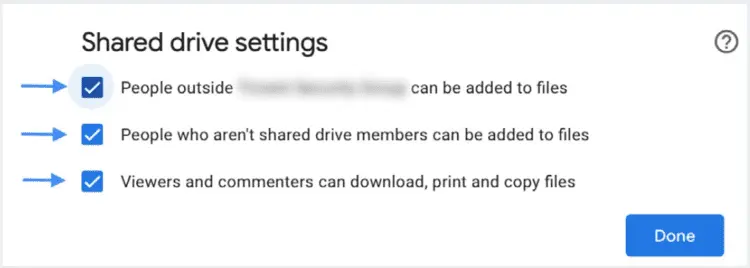
Please note that in this stage, you can prevent users from allowing other people to view your content, as well as restrict them from moving, downloading, copying, and printing documents.
Level Up Google Drive Shared Permissions with Pics.io
Pics.io is a software for easy and intuitive Google Drive digital asset management. Pics.io digital asset management (DAM) system connects to your file storage and can work with all of its content, so you don't have to move your data to another service.
Pics.io improves file sharing by providing convenient tools for securely sharing information both internally and externally. Websites allow you to host multiple files of different formats for clients or partners. Using this feature, you can personalize your mini-portal with a corporate style. Inboxes, conversely, allow you to accept digital assets from contractors. To upload files to them, users only need an link — they don't have to create an account or log in to the service.
Pics.io platform also has advanced user permission settings. You can set access rights for individual files and collections of digital assets. The difference from the basic functionality of how to share Google Drive is that Pics.io DAM has the flexibility to set permissions for individual features:
- Changing the design of websites and inboxes;
- Transcribing videos;
- Watermarking images;
- Recognizing faces in photos;
- Importing databases in CSV format;
- Comparing versions of digital assets;
- Adding custom metadata fields, etc.
Conclusion
Proper use of shared drives in Google Workspace allows you to significantly increase teamwork productivity by providing users with shared access to the materials they need. By choosing appropriate settings, you can also ensure the security of confidential materials, limit their distribution and prohibit sharing with unauthorized parties. To optimize workflows, you can use simple, proven strategies, such as creating separate shared drives for each project, selecting the necessary Drive Google levels of access for users, hiding unnecessary folders, and organizing work groups.
Did you enjoy this article? Give Pics.io a try — or book a demo with us, and we'll be happy to answer any of your questions.


