
Updated 20/11/2025
In this article, you’ll learn:
If your Google Drive feels more like a junk drawer than a workspace, you’re not alone. Most teams start with “just upload it here” and end up with ten versions of the same file, random folders, and nobody is sure where the real final lives.
Inside the Pics.io team, we’re almost obsessed with “file discipline”: clear folder structures, naming rules, and shared standards for how we store and share work. It wasn’t always like this — we’ve lost files, shipped wrong versions, and wasted hours in messy shared drives. In this article, I’ll share what we’ve learned while cleaning up our own chaos and helping hundreds of teams do the same.
Cloud storage like Google Drive can be a powerful way to speed up everyday work — but only if your files are organized. Otherwise, your team just trades local chaos for cloud chaos and keeps wasting time scrolling through “Final_v2_NEW(1).docx”.
According to research summarized by the Regional Government Services Authority, document-related issues account for about 21.3% of productivity loss, and employees spend roughly 9 hours every week just searching for and gathering information. Poorly structured folders and unclear file names turn Drive into one more bottleneck instead of a productivity booster.
Why do we write this guide?
We put together 14 practical Google Drive organization tips that actually work for real teams — from small marketing departments to growing companies with shared drives and lots of collaborators. The goal is simple:
- Cut the time spent searching for files
- Reduce duplicates and outdated versions
- make onboarding new teammates much easier
- Keep sensitive documents accessible, but under control.
Google's own documentation recommends starting with simple, predictable folder structures and consistent naming, rather than relying solely on search. In their official guide on organizing files in Drive, they cover the basics like folders, shortcuts, and color-coding — we've translated those ideas into practical workflows for real teams.
If your Drive is already overflowing with random folders, links, and "Copy of…" files — this guide will help you move from chaos to a clear, predictable structure without starting from scratch.
Google Drive organization checklist
If you don't have time to read the full article, use this table as a 2-minute checklist. It gives you a quick overview of what to do, why it matters, and when each tip is most useful.
| Tip | What to do | Why it helps | Best for / When to use |
|---|---|---|---|
| 1. Naming conventions | Use clear, consistent file names with type + topic/project + status + date/version. | Makes search and sorting predictable; reduces confusion between versions; easier onboarding for new teammates. | Teams with many similar docs (reports, briefs, contracts, content assets). |
| 2. Folder & subfolder structure | Build a simple, logical folder tree. Mirror your naming logic in folders. | You always know where this type of file lives; reduces depthless “file soup” in My Drive. | Shared drives, cross-functional projects, large teams. |
| 3. File/folder descriptions | Add short descriptions, hashtags, and key terms in the file details panel. | Descriptions are searchable, so you can find assets even if the title isn’t perfect. | Teams with lots of similar assets or inconsistent historical naming. |
| 4. Color-coding folders | Assign colors to top-level folders (e.g. red = urgent, green = approved, blue = archive). | Visual cues speed up navigation and help new teammates understand structure at a glance. | Visual thinkers, busy folders with many subfolders. |
| 5. Add files to multiple folders | Use Shift+Z (or "Add shortcut") to place the same file in several folders without duplicating it. | One authoritative version, multiple entry points; avoids conflicting copies and messy updates. | Files used by multiple departments (budgets, brand assets, legal docs). |
| 6. Don’t “organize” Shared with me | Avoid cleaning or restructuring the Shared with me section. Organize important shared docs into your own folders or Workspaces instead. | Prevents accidental access issues and broken links; you still keep shared content findable via your own structure. | Anyone working with many external or cross-team shares. |
| 7. Use Recent sidebar | Open the Recent tab for quick access to files you or your team touched last. | Reflects real-world priorities; you rarely search for something you haven’t used in months. | Day-to-day work, rapid context switching between tasks. |
| 8. Star important items | Use Starred for key folders and documents — especially in free Drive accounts without Workspaces. | A simple personal favorites area; faster to open core materials than digging through folder trees. | Individual contributors, small teams, freelancers. |
| 9. Learn fast multi-selection | Use Ctrl / Cmd + click, Shift + click, or mouse drag to select multiple files and folders in bulk. | Speeds up renaming, moving, and cleaning; makes periodic maintenance much less painful. | Any cleanup or mass-reorganization sessions. |
| 10. Clear clutter & duplicates | Regularly delete duplicates, obsolete drafts, and outdated versions (manually or via add-ons). | Less noise in search, lighter storage usage, fewer mistakes when someone grabs the wrong file. | Teams with long project history or frequent file copying. |
| 11. Activity sidebar | Use the Activity panel (i icon → Activity) to see who edited what and when in shared folders. | Improves transparency, helps track approvals, and reduces “who changed this?” confusion. | Collaborative projects, approvals, compliance-sensitive workflows. |
| 12. Advanced search filters | Use advanced search by type, owner, date, location, and simple operators. | Makes search precise even in very large libraries; cuts down wild guessing and scrolling. | Mature teams with years of files and many collaborators. |
| 13. Labels (paid) | Apply labels with fields like department, status, sensitivity, or retention rules. | Adds structured metadata and access rules on top of files, beyond just folders and names. | Larger organizations with security policies, compliance, or complex access rules. |
| 14. Connect Google Drive to a DAM (e.g. Pics.io) | Use a digital asset management (DAM) layer on top of Drive for richer search, visual search, roles, and branded sharing. | Turns Drive into a full content hub: better discovery, collaboration, and control over creative assets. | Creative & brand teams; large visual libraries; external reviewer/client access. |
Tip #1: Use consistent naming conventions for your digital assets
How did archivists find the proper papers among millions of documents before the digital age? It's straightforward — they used a well-thought-out sorting and cataloging system. It remains relevant today and can be used to answer the question of how to organize files in Google Drive.
How to speed up file search?
When you use consistent naming conventions for your Google Drive files, it becomes much easier for users to find them later. A clear file name should describe the file type, project, status, and date. Avoid random special characters and focus on meaningful keywords that reflect how your team actually searches for documents and digital files.
Follow these recommendations:
- Indicate the type of document at the beginning of the title — business plan, operating instructions, or financial statement.
- Write the sorting principle — by company departments, individual projects, employee names, product names, etc.
- Add a clarifying description or hashtag to the name — they will reflect the importance, urgency, or task at hand.
- Add the document date or version — this will help ensure that all participants in the workflow are using the latest digital assets.
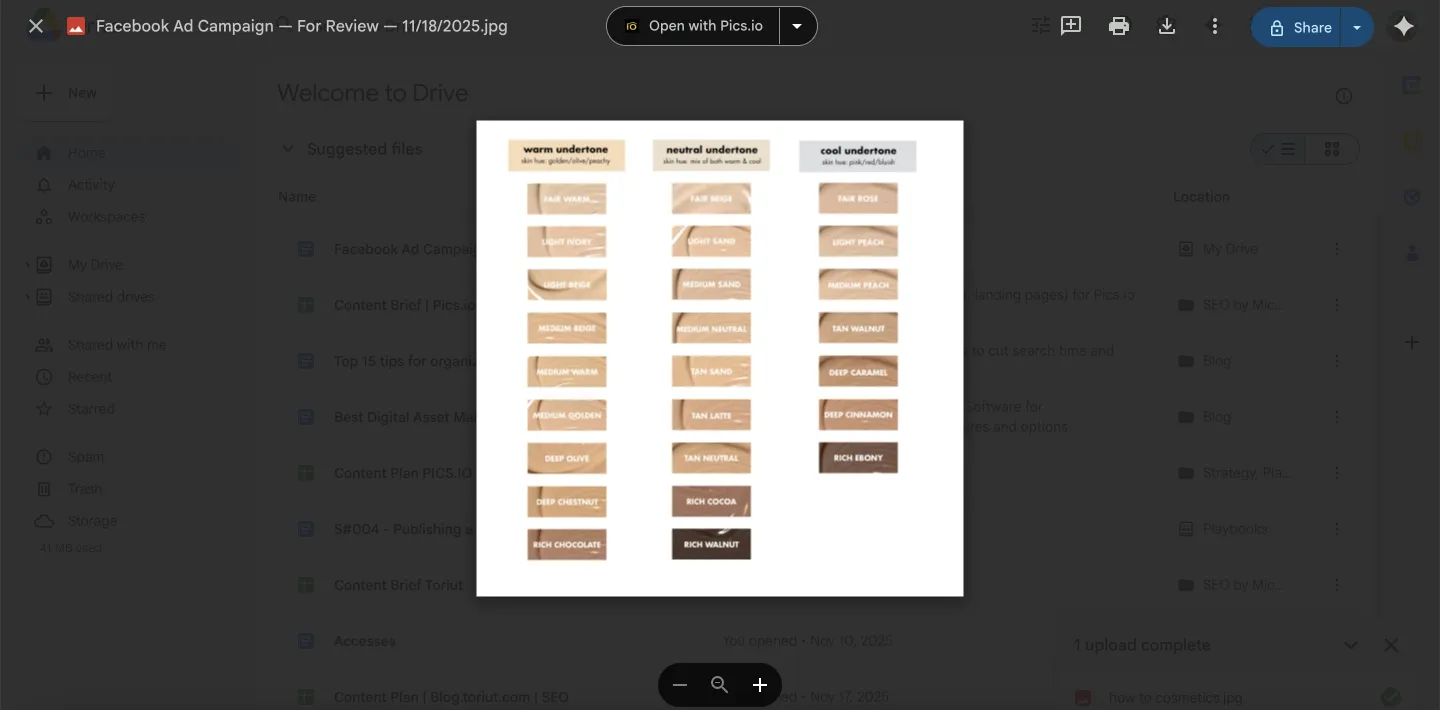
Using these Google Drive organization tips, you'll end up with documents named something like "Facebook Ad Campaign — For Review — 11/18/2025." You'll agree that such a file will be easy to distinguish from "Tesla Financial Statements — for presentation — 11/01/2025."
Tip #2. Create folders and subfolders
When it comes to large repositories with tens or hundreds of thousands of digital assets, a simple file-naming system will not suffice. But you can improve it by converting each naming level into folders and subfolders. They will contain only the documents you need to work on a particular task so that you won't be distracted by anything else.
A simple folder tree is the backbone of better organization in Google Drive. Start with a few top-level folders by department or project, then create folders and subfolders under them instead of dumping files and folders into "My Drive". Each new folder should have a clear purpose so that specific files don't end up scattered across other folders.
When you organize files this way, it becomes easier to sort files by project or team, give easy access to essential files, and avoid creating dozens of almost identical folders with the same color or name.
How to create a cataloging system
If you know how to organize files into folders in Google Drive, you'll have a similar cataloging system:
- Base folder — Marketing Department;
- 1st level subfolder — Email newsletters;
- 2nd level subfolder — Completed;
- File name — Email Newsletter Analysis — For Management — 05.01.2024.
Tip #3. Use file/folder descriptions
The key advantage of this Google Drive file organization method is that the descriptions you provide will be searchable. So, anyone can find them by hashtags or keywords in just a few seconds.
Making descriptions work as mini-metadata
The instructions are as follows:
1. Find the file and click the button with three dots in the upper right corner.
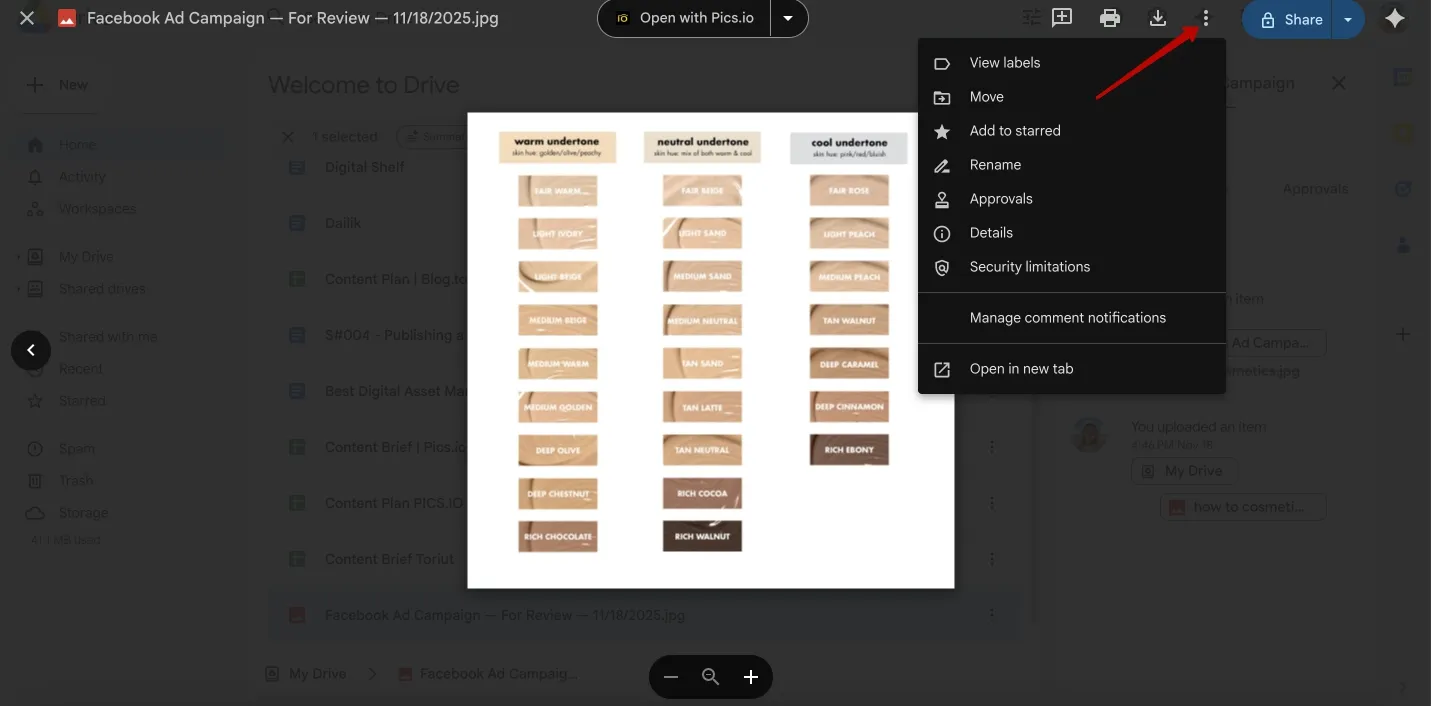
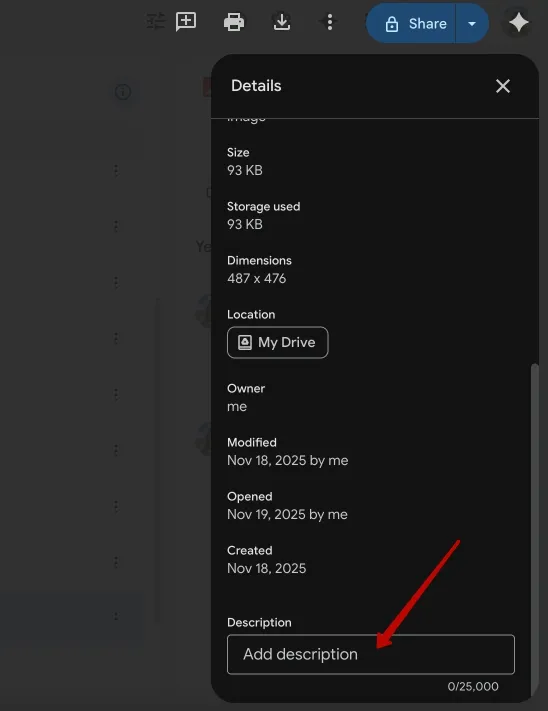
2. In the context menu, select the File Information section and then Details.
3. Detailed information about the file appears on the right.
4. Scroll to the bottom, where you'll find a blank description field.
5. Fill in this field with any information you want, such as a short description in words, hashtags, names of other users, etc.
Tip #4. Color-code your folders
Simple solutions are usually the most convenient. Why create a million hashtags, descriptions, and keywords if you can distinguish important documents visually? That's why one of the best ways to organize folders in Google Drive is to use color coding.
Color coding is one of the simplest Google Drive tips for visual people. When you color-code your folders, you can spot essential files and specific folders at a glance. Use a different color code for each team or status, and avoid assigning the same color to multiple folders, so your Google Drive-organized system stays readable.
Simple color-coding editing for your Drive
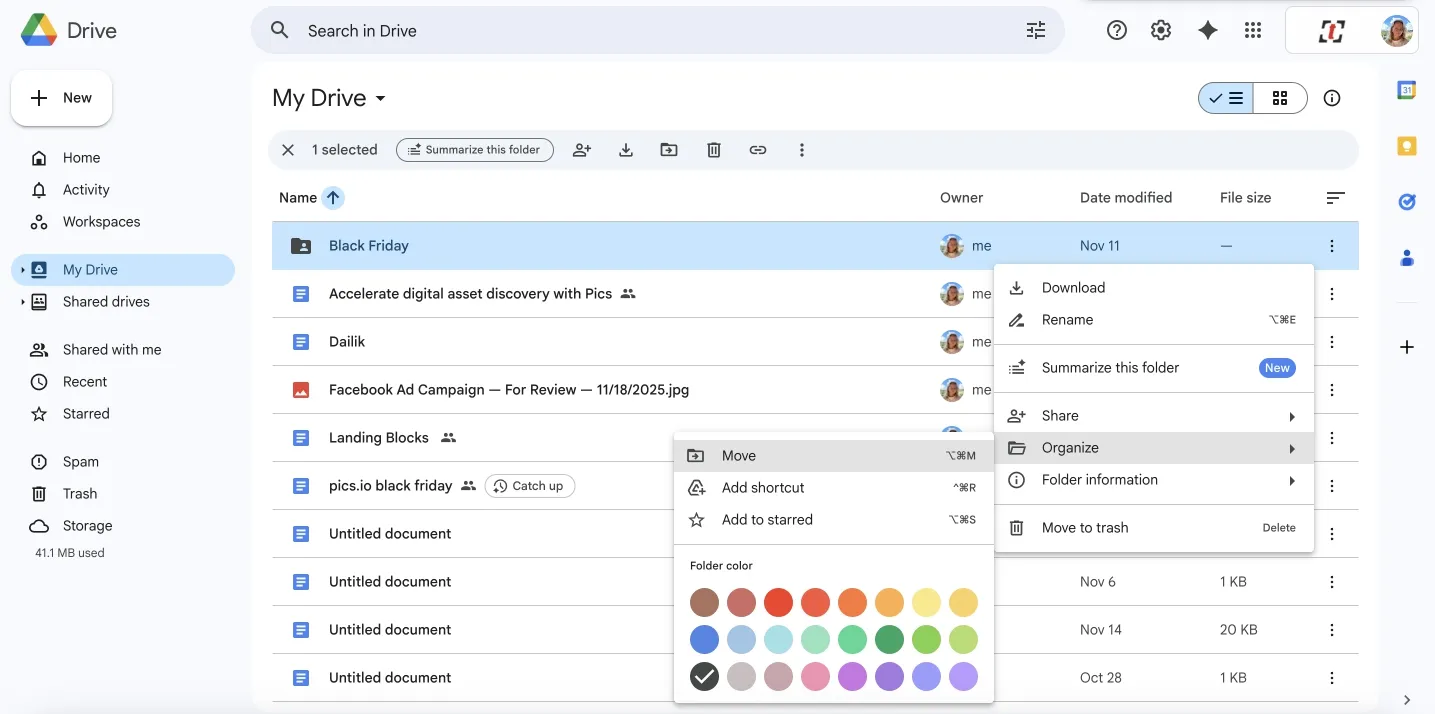
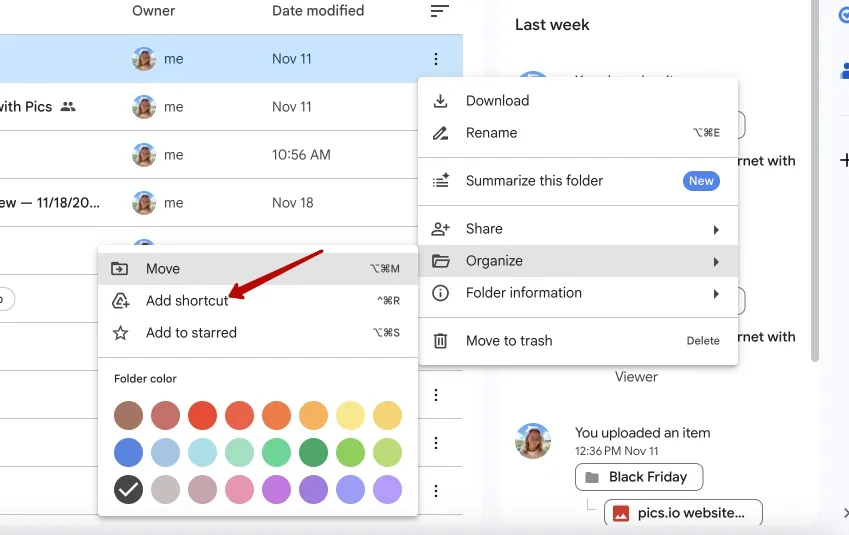
To change the icon color, open the folder and tap the three-dot button on the right. Go to the Organize section and choose a color.
After that, a single glance will be enough to identify priority folders that need immediate attention.
Tip #5. Add docs to multiple folders
Sometimes the same Google Doc or report belongs to multiple folders. Instead of copying or creating duplicate files, use shortcuts to add docs to various locations. In Google Drive, you can add shortcuts via a small pop-up or the right-click menu, so the latest version always lives in one place but appears in several workflows.
Also, you may need the same document at several stages of your workflow. For example, a financial plan may be required by accountants, managers, marketers, and auditors. To provide convenient access to a file, you can place a link to it in several folders at once. In this case, the document is not copied and does not fill up disk space. Only its shortcut, which takes up several kilobytes, is visible in other folders.
Adding shortcuts
This method of organizing folders in Google Drive is also straightforward. You can use it by selecting a document and pressing Shift+Z. A dialog box will appear on the screen where you will need to specify the appropriate folders.
Tip #6. Don't optimize the "Shared with me" section
This section is usually a total mess. That's why most users wonder how to organize Google Drive for teams so they can easily find shared files and folders. But it's better not to do this. Deleting or moving documents can create problems with access to them. It will lead to disruption rather than workflow improvement.
Tip #7: Use the recent sidebar
In most cases, the files you've used most recently have the highest priority. If you need to quickly organize Google Drive, click the Recent button in the left sidebar.
In this section, you can see not only the files in your storage but also documents shared by other users that are available to you. They'll be sorted by the time they were last modified, making them easier to find.
Tip #8: Use the star feature for quick access
Back to simple Google Drive organization hints. The star feature is perfect for personal quick access to core documents. Mark the files and folders that you open every day, instead of digging through other files on the left side of the interface. Combined with folder color-coding, stars help you stay organized without changing how the whole team works.
Building a personal favorites space
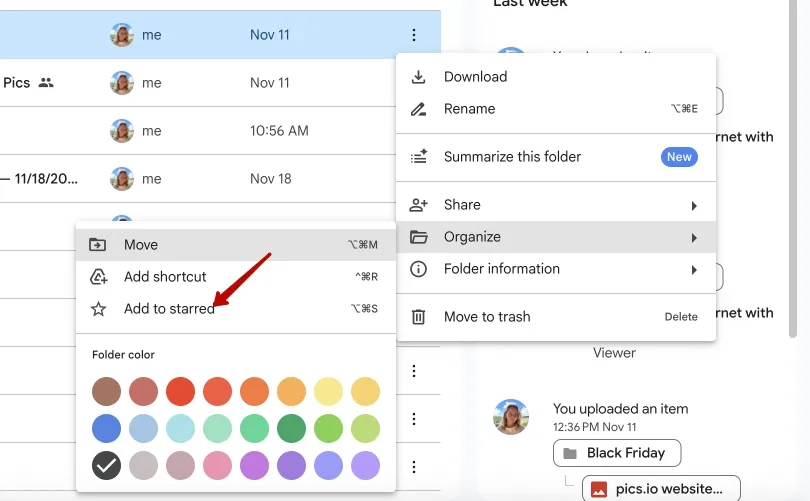
Just click the three-dot button next to a folder or file. Select Organize, then click the Add to Starred button.
A helpful tip for those wondering how to organize documents in Google Drive. You can put stars on any files you share with others — they don't have to be in your storage. It makes it much easier to work on projects together within the company.
Tip #9. Select files faster with the Ctrl and Shift functions
This method is well known to those who have been working with computers for more than 10 years and have seen days when most commands were given using the keyboard. They can provide you with the following Google Drive organization tips:
- By holding down the Ctrl button and clicking on the icons, you can select multiple files and folders in a non-sequential manner, choosing only the items you need.
- By selecting the first icon of the list and holding down Shift, you can choose the entire group — move the cursor to the last item and click. All files and folders in the space between them will be automatically selected.
Among other tips for organizing Google Drive is selecting multiple icons with the mouse. Move the cursor slightly above and to the left of the first item in the list. Hold down the left mouse button. Move the mouse down and to the right until you've selected all the files and folders you need.
Tip #10. Clear storage to declutter
Often, organizing Google Drive folders involves finding and deleting duplicate or older versions of documents. In this case, manual work will take a lot of time.
How to clean up duplicates and old versions
Earlier, we explained how to delete duplicate files in Google Drive. You can automate this process by connecting external services and cloud storage add-ons. It allows businesses to save dozens of working hours and hundreds of dollars in subscription fees.
Tip #11: Maximize the power of the activity sidebar
The Recent section will display all recent activity. For example, it lets you know that documents have been reviewed by the responsible parties, corrected, and approved for publication.
How to check activity
To open the Activity sidebar, go to My Drive and click the info button (i) in the upper right corner. Select the Activity and check the information below. The most recent activities will be sorted by date.

Tip #12: Harness the advanced search feature
Even with a well-thought-out document naming system, you'll still come across files and folders that have very similar names. It will make it much more difficult to select them using the search bar. But you can use advanced search.
How to set advanced search
The easiest way to access this feature is to click the Settings button in the search bar. You'll see a dialog box that allows you to select digital assets by type, modification date, access rights, location, and more.
To learn more about how this feature works, read our article on how to search in Google Drive. You'll learn about request syntax, which allows you to refine your search with simple commands.
If you want the "official" version, Google's own "Search for files in Google Drive" help page documents these filters and operators in much more technical language — we translated the same capabilities into everyday use cases for teams.
For example:
- "type: xls" — selects Microsoft Excel spreadsheets of earlier versions;
- "before: January 2024" — search for files created before January 2024;
- "owner: Alex" — work with files owned by the corresponding user.
Tip #13: Use labels
In the paid version of the service, you can organize your Google Drive documents (excluding folders) using labels. Google defines labels as metadata you apply to files to help manage, find, and apply policies to them in Drive — we'll look at how to use them in a simple, non-admin way.
The organization process looks like this:
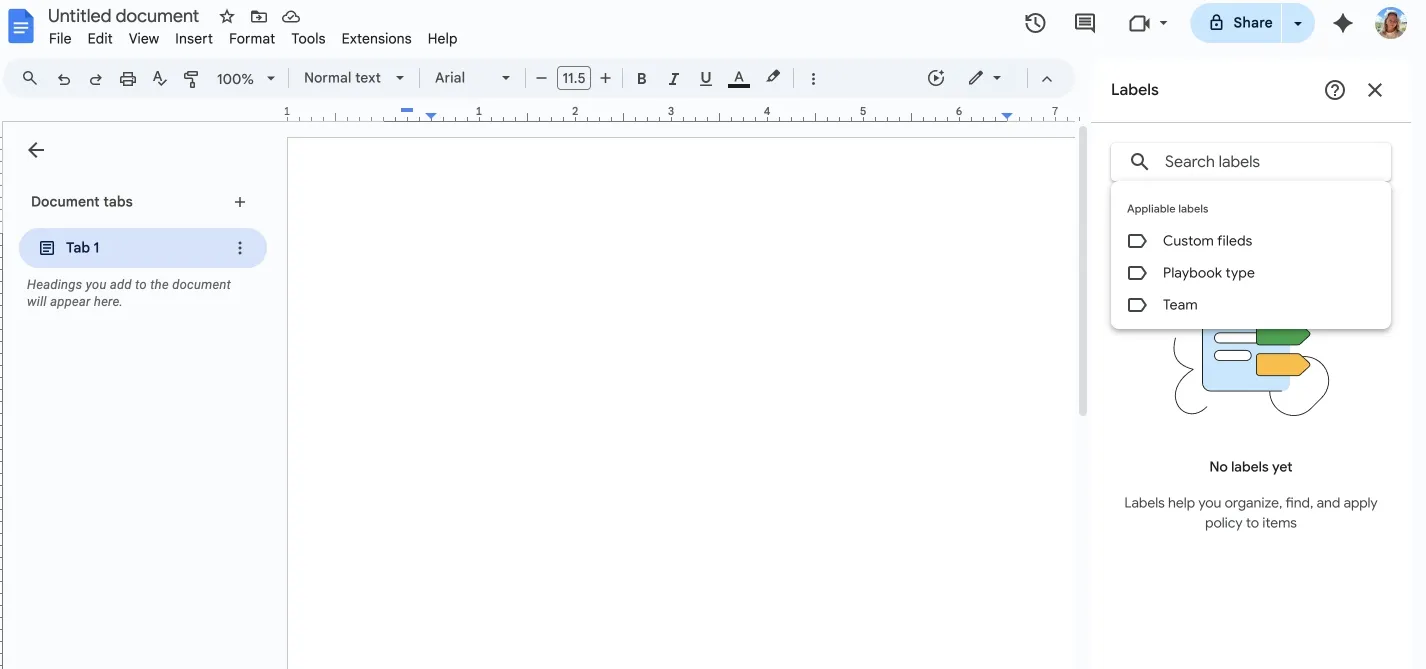
1. Open your settings and find the Labels section, or follow this link right away if you have the necessary access.
2. Choose one of the standard templates or click Create New to create a new label from scratch. You can also quickly find ready-made labels — start typing the name in the appropriate field in the settings.
3. Enter a name for the label and a short description, if necessary.
4. If you want the label to be copied with the file, check the box.
5. Enter additional information — up to 10 fields.
6. Save Settings.
How to set access rules
It is essential to understand that a label does not just mark digital assets. It can set access rules for them. For example, you can share digital assets with specific departments in the company or with users who have a particular role in Google Drive. To add a custom label to a file, open your file, click File in the top-left corner, then Labels, then Apply label. Another way to do this without opening the file is to click the three dots to the right, then Labels, then Apply Label.
You can also view Labels by following the same path but choosing View labels as the last step.
Tip #14: Use Google Drive with a Digital Asset Management solution
One advantage of cloud storage is that it supports numerous external services. Among them are digital asset management platforms, which may be the best way to organize Google Drive. Digital asset management allows you to efficiently store, search, and sort files and folders, share them, send them to workflow participants, and label and edit information.
One example that can help you organize your Google Drive is the online service Pics.io.
Advantages of using DAM:
1. Advanced search function — more convenient and faster than Google. It allows you to quickly find files due to multiple filters and metadata (including custom fields).
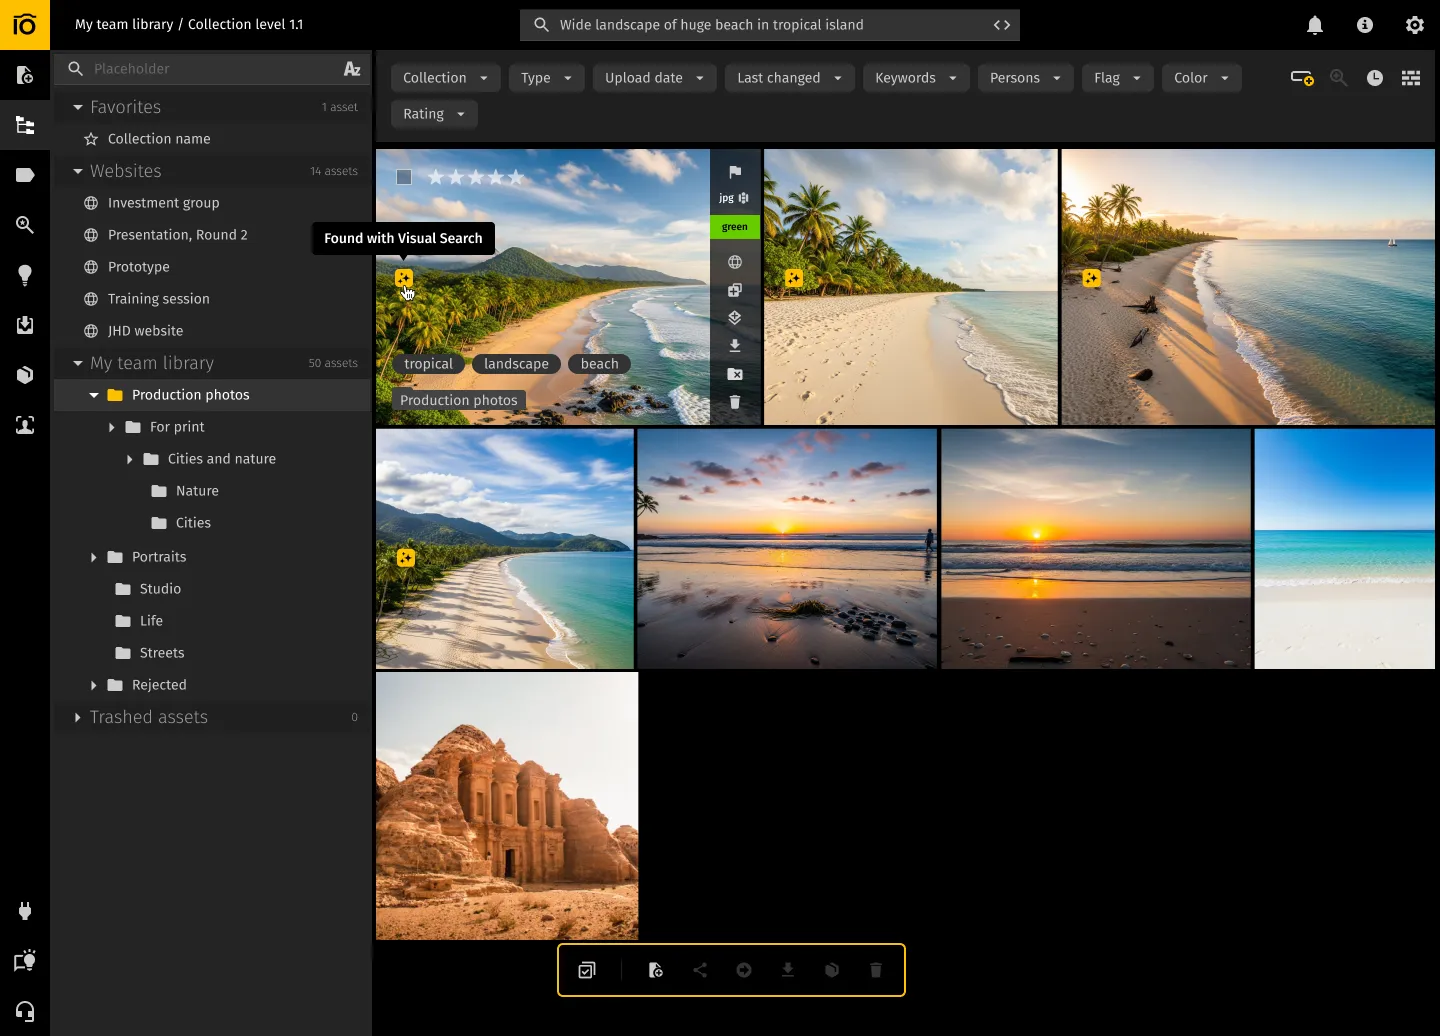
2. Visual search helps you find similar images without using metadata, using picture context instead. For example, you can ask the platform to find images similar to your hat lying on the grass. And it will find pictures that are as similar as the specified percentage. What's more, you can select the context that you are a fashion designer, and the search will work through the lens of your profession, looking not just for a hat, but for that very Tribbi hat.
3. The ability to leave comments, tag other users on digital assets, and provide permissions to edit, publish, view, etc. This way, you speed up your workflow and keep the whole team up to date with the latest changes.
4. Sharing single and multiple files as shared collections (websites). It is very convenient if you need to share a large number of files with users who are not part of your team.
5. AI transcription of video and audio; face recognition for photos. It also helps you work with content faster, finding the right people or content among thousands of files.
You can learn more in our article about DAM for Google Drive. It's also worth noting that Pics.io lets you choose your own cloud storage provider. Unlike its analogs, it does not limit your choices or increase costs by forcing you to sign up for additional subscriptions.
FAQ
1. How often should I clean up my Google Drive?
For most teams, a light cleanup once a month is enough: archive completed projects, remove obvious duplicates, and close "temporary" folders. Once or twice a year, conduct a deeper review of top-level folders and shared drives to ensure the structure still aligns with how your team actually works.
2. What's the fastest way to organize my Google Drive without starting from scratch?
Most people who search "how can I organize my Google Drive" don't need a perfect system — they need a fast win. Focus on the top 10–20 folders and files you use every day: group them into clear top-level folders, apply color coding, and add them to Starred. It instantly makes daily work easier, and you can organize the rest of Google Drive step by step later.
3. Is it better to rely on folders or on search?
You need both. Folders give everyone a shared structure ("Marketing → Campaigns → 2025"), while good naming and metadata make search fast and reliable. A simple rule: use folders for where files live, and use search (plus consistent names) for how you find them quickly.
4. How can I make sure new team members don't break the structure?
Document a simple set of rules: folder blueprint, naming convention, and where different types of files should go (drafts, finals, archives). Share this guide in your main shared Drive, walk new teammates through it during onboarding, and ask managers to enforce it in their teams.
5. When does it make sense to use a DAM together with Google Drive?
If you only store basic docs and a few images, Drive is usually enough. But if you manage thousands of visuals, reuse assets across channels, or have strict brand/rights rules, adding a digital asset management (DAM) tool like Pics.io on top of Google Drive helps a lot with search, control, and collaboration.
Conclusion
Every hour spent searching for the right files on Google Drive costs you tens or hundreds of dollars. It is working time that your employees could spend on more critical tasks. That's why proper organization of work with Google Drive is so important.
You can apply all the techniques described in this article or choose just a few. But even that will help increase productivity.
Did you enjoy this article? Give Pics.io a try — or book a demo with us, and we'll be happy to answer any of your questions.

Maks Petrenko is an Operations Manager and PhD candidate in Management. He specializes in workflow optimization, performance tracking, and data-driven improvements. Maks has led teams of 20+, rolled out KPIs, and built cross-department workflows for Support, Marketing, R&D, and Sales—cutting return rates from 26% to 10%, raising activation from 8% to 13% in two months, and quadrupling MQLs within six months.


