
Contents:
When I first started working with digital photos, I had no idea there was so much hidden information packed into each file. But that’s exactly what image metadata is—those little details baked right into your pictures that tell the story behind them. Things like who took the photo, when and where it was taken, what it’s about, and even who owns the rights.
Sometimes your camera takes care of this automatically, but you can also add or edit metadata yourself using the right software. It’s not just about staying organized—it helps protect your work from being misused and makes it easier to find the images you need later.
So if you’ve ever wondered how to add metadata to your photos—or why you should—let me walk you through it step by step.
How to Add Metadata to Photos: A Quick & Simple Guide
| Step | What It Means | Tools You Can Use |
|---|---|---|
| 📸 Take the Photo | Your camera adds basic details like date, time, and settings | Any digital camera or smartphone |
| 🖥️ Open the Image | Load the photo into a tool where you can view and edit metadata | Photoshop, Lightroom, Windows Photos, etc. |
| 📝 Add Descriptions | Type in titles, keywords, and captions that describe the image | IPTC fields via photo editors or DAM tools |
| ©️ Include Copyright Info | Add your name, rights info, and licensing terms to protect work | Built-in metadata panels or metadata editors |
| 🌍 Add Location (if missing) | Drop a pin on where the photo was taken | Lightroom, GeoSetter, or some DAM platforms |
| 💾 Save Changes | Make sure your edits are saved into the file | Use “Save” or “Export with Metadata” option |
What Is Metadata in Photos and Why It Matters
Before I really got into photography, I used to think a photo was just… a photo. You click the shutter, save the file, and that’s it. But once I started organizing my growing collection—and especially when I began sharing images online—I realized there’s a whole layer of hidden information baked into every shot.
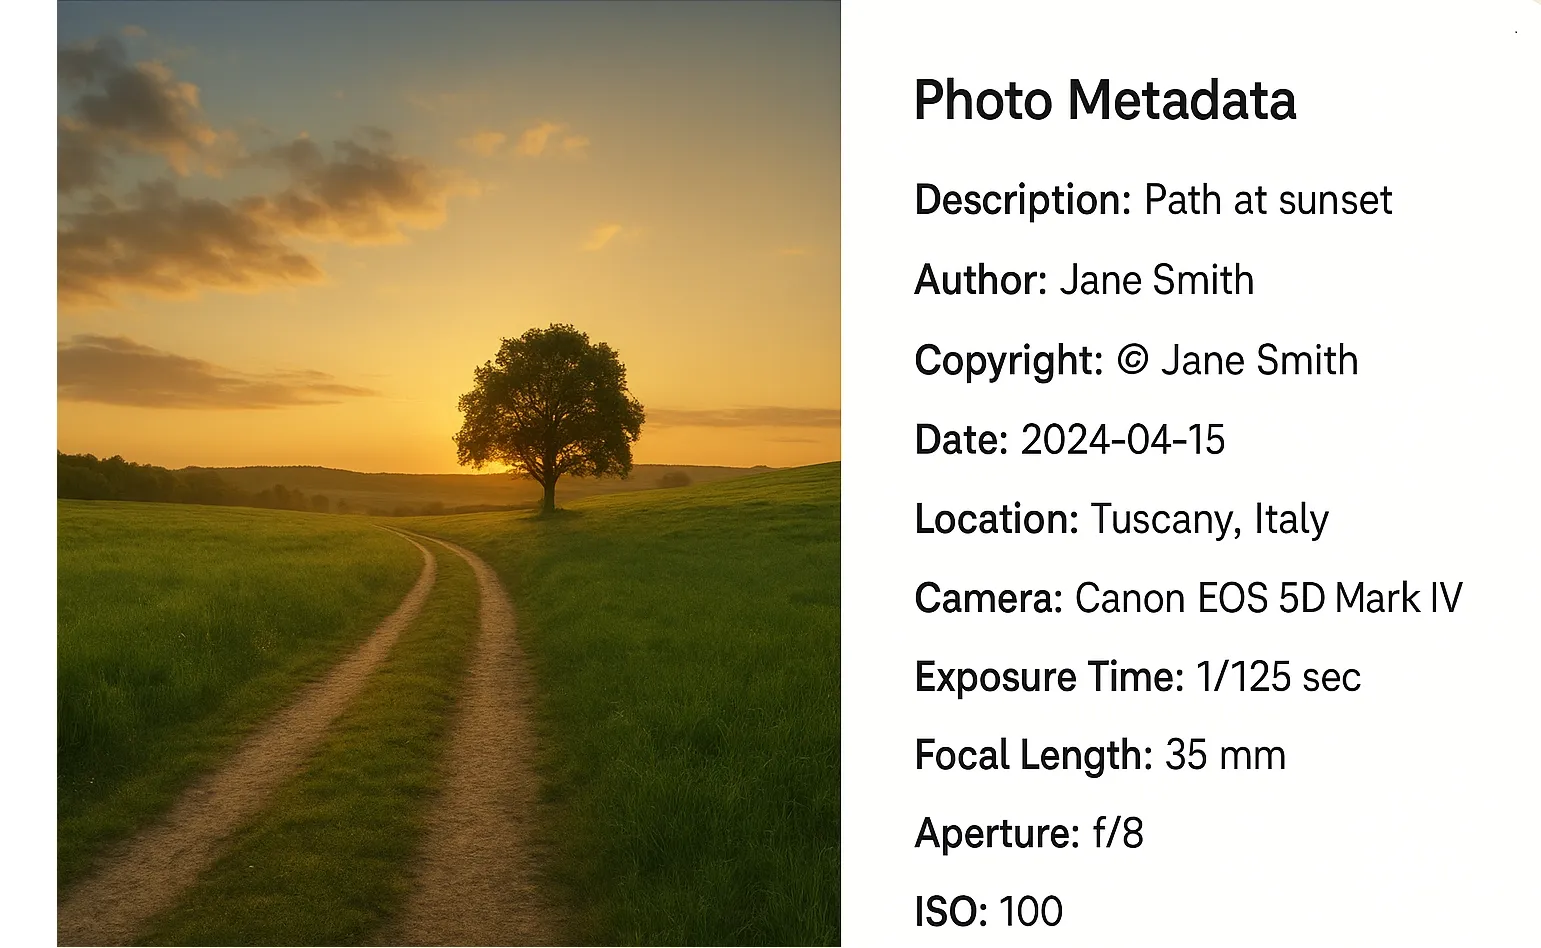
So, what is metadata in photos? In simple terms, it's extra data stored inside your image file. This includes everything from when and where the photo was taken to the camera settings you used, plus any descriptions, tags, or copyright info you (or your software) might add later. You can think of it like the back of an old printed photo—only digital.
Now, why does any of this matter?
First off, metadata makes organizing and finding photos so much easier. If you’ve ever tried searching for that one great landscape you shot in Italy three years ago, metadata can help you track it down in seconds—by location, keyword, or even date.
It’s also super important for copyright and ownership. Adding your name, contact info, and licensing details to your images means there's less chance they’ll be used without permission. And if you’re part of a team or working professionally, metadata keeps everyone on the same page—literally—when it comes to usage rights, image context, and workflow.
So while it might seem like a small detail, metadata is actually one of the most powerful tools a photographer (or designer, or marketer) can use to stay organized, protect their work, and keep things running smoothly behind the scenes.
What Are Metadata Categories?
Different experts slice things up in different ways, but in general, image metadata tends to fall into three main categories. Understanding these helped me a lot—especially when I wanted to know how to edit metadata properly.
Here’s a quick breakdown of what I’ve learned:
- Technical metadata is the stuff your camera adds automatically. We're talking about things like the camera make and model, shutter speed, aperture, ISO, resolution, and sometimes even the GPS coordinates of where the photo was taken. This kind of metadata is typically stored in something called the EXIF format (Exchangeable Image File Format), and while you can view it easily, editing it takes a bit more effort.
-
Administrative metadata is more about the behind-the-scenes info that helps manage rights and usage. This includes licensing terms, copyright details, and any rules about how the image can be reused. You usually add or change this info manually using metadata editors or DAM (digital asset management) tools. It’s part of what helps protect your content from being used without permission.
- Descriptive metadata is what you use to describe the photo itself—keywords, captions, the creator’s name, and any other notes that make the image easier to search and understand. Like administrative data, this is also added manually, and it's what makes your images findable in search engines or internal libraries.
To properly add and manage this kind of data, it's good to know the difference between EXIF and IPTC formats. EXIF holds most of the technical info and is handled automatically by your device, while IPTC (developed by the International Press Telecommunications Council) covers administrative and descriptive fields—and that’s the part you can edit directly.
How to View Metadata on Desktop and Mobile
The first time I tried to check the details behind a photo I’d taken, I had no idea where to look or what tools to use. But once you figure it out, viewing metadata becomes second nature.
On desktop, it’s pretty straightforward.
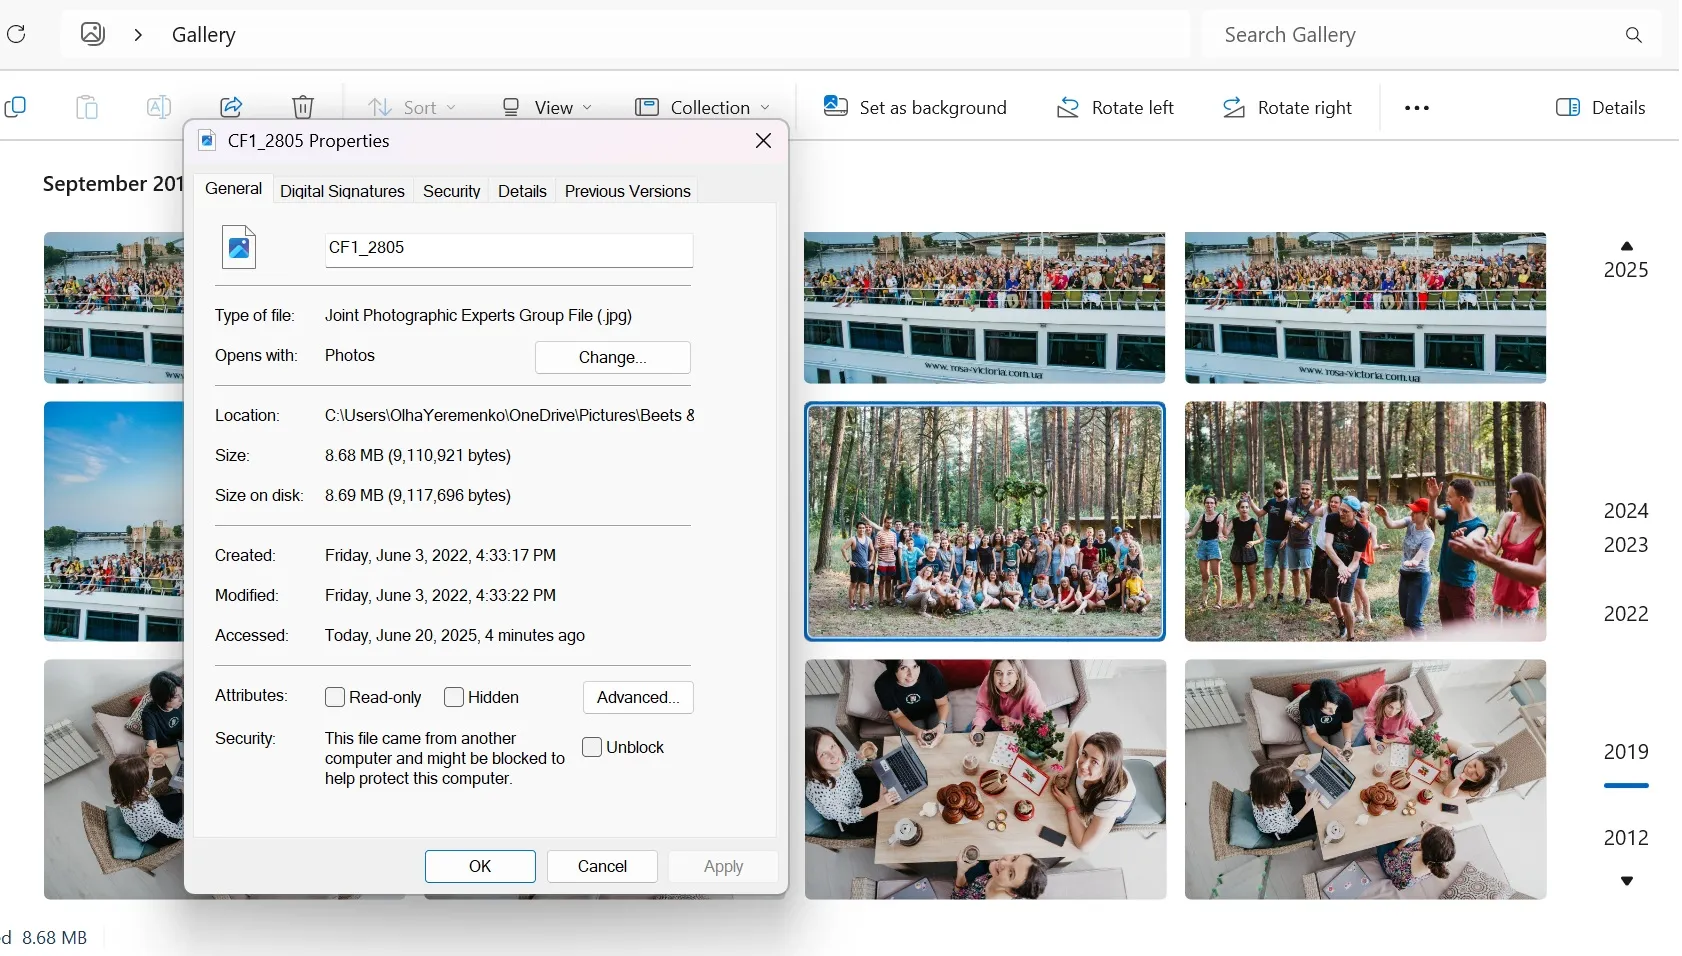
- If you're using Windows, just right-click on the photo file and select Properties. Then switch to the Details tab, and there it is—all the basic metadata: date taken, dimensions, camera model, exposure, and more.
- On a Mac, open the image in Preview, go to Tools in the menu bar, and choose Show Inspector. In the Info panel (the little “i” icon), you’ll see tabs for general info, EXIF data, and sometimes even GPS coordinates.
Now, if you're wondering how to get metadata from photo on your phone, there are a few tricks.
- On iPhone, just open the Photos app, swipe up on an image, and you’ll see when and where it was taken, what device was used, and other useful bits. You can even edit the date and location directly from there.
- If you’re using Android, you might need a little help from a third-party app—depending on your phone brand. When I looked into how to view photo metadata on Android, I found that apps like Photo EXIF Editor, ExifTool, or even Google Photos (to some extent) do the job. In Google Photos, just open a picture, swipe up or tap the three dots, and you’ll see the date, location (if available), and basic camera settings.
Whether you're editing, sharing, or organizing your images, knowing how to access this info helps a lot—and it’s the first step if you ever plan to edit or add metadata later on.
How to Add or Edit Metadata (EXIF) in Your Images
Once I got more serious about managing my photo collection, I realized that knowing how to edit metadata is just as important as knowing how to shoot in manual mode. Whether you're updating copyright info, adding keywords, or cleaning up auto-generated data, editing metadata helps keep your images organized, searchable, and protected.
Let me walk you through how I usually do it—whether I’m working on desktop, mobile, or using editing software.
Adjusting Metadata Settings on Different Devices
When using a DSLR or mirrorless camera, you can sometimes set default metadata before even snapping a photo. Here’s how I do it:
- Connect your camera to your computer and open the manufacturer’s software (Canon, Nikon, Sony—they all have their own tools).
- Find the section that shows camera settings or file info.
- Look for a place to edit metadata fields—like copyright, author name, or shooting location.
- Type in the details you want, save the changes, and you’re good to go.
For phones, the process is a bit different:
- On iOS or Android, open your Camera app.
- Head into Settings (you’ll usually find a gear icon).
- In some models, you’ll see options to set default location info or add watermark-style details. But most phones don’t let you fully customize metadata from here—you’ll need a photo viewer or third-party app for that.

How to Add Metadata to Photos on a Smartphone
Sometimes I just need to tweak one or two photos right on my phone. If you’re wondering how to edit photo metadata or add metadata to image without switching to a computer, here’s what works:
- Open the image in your gallery or built-in photo viewer.
- Tap the three-dot menu or Info icon.
- Look for options like Details, Info, or Features.
- If editable, you can tap fields to update the title, location, date, or description.
Now, depending on your phone model or OS version, some of these fields might be locked. In that case, I recommend using third-party apps like Photo EXIF Editor (Android), Exif Metadata (iOS), or Metapho (iOS). They let you fully view and edit metadata without much fuss.
Adding Metadata Using Software
Let’s talk about desktop tools. These give you the most control, especially if you're working with a lot of photos.
- In Adobe Lightroom
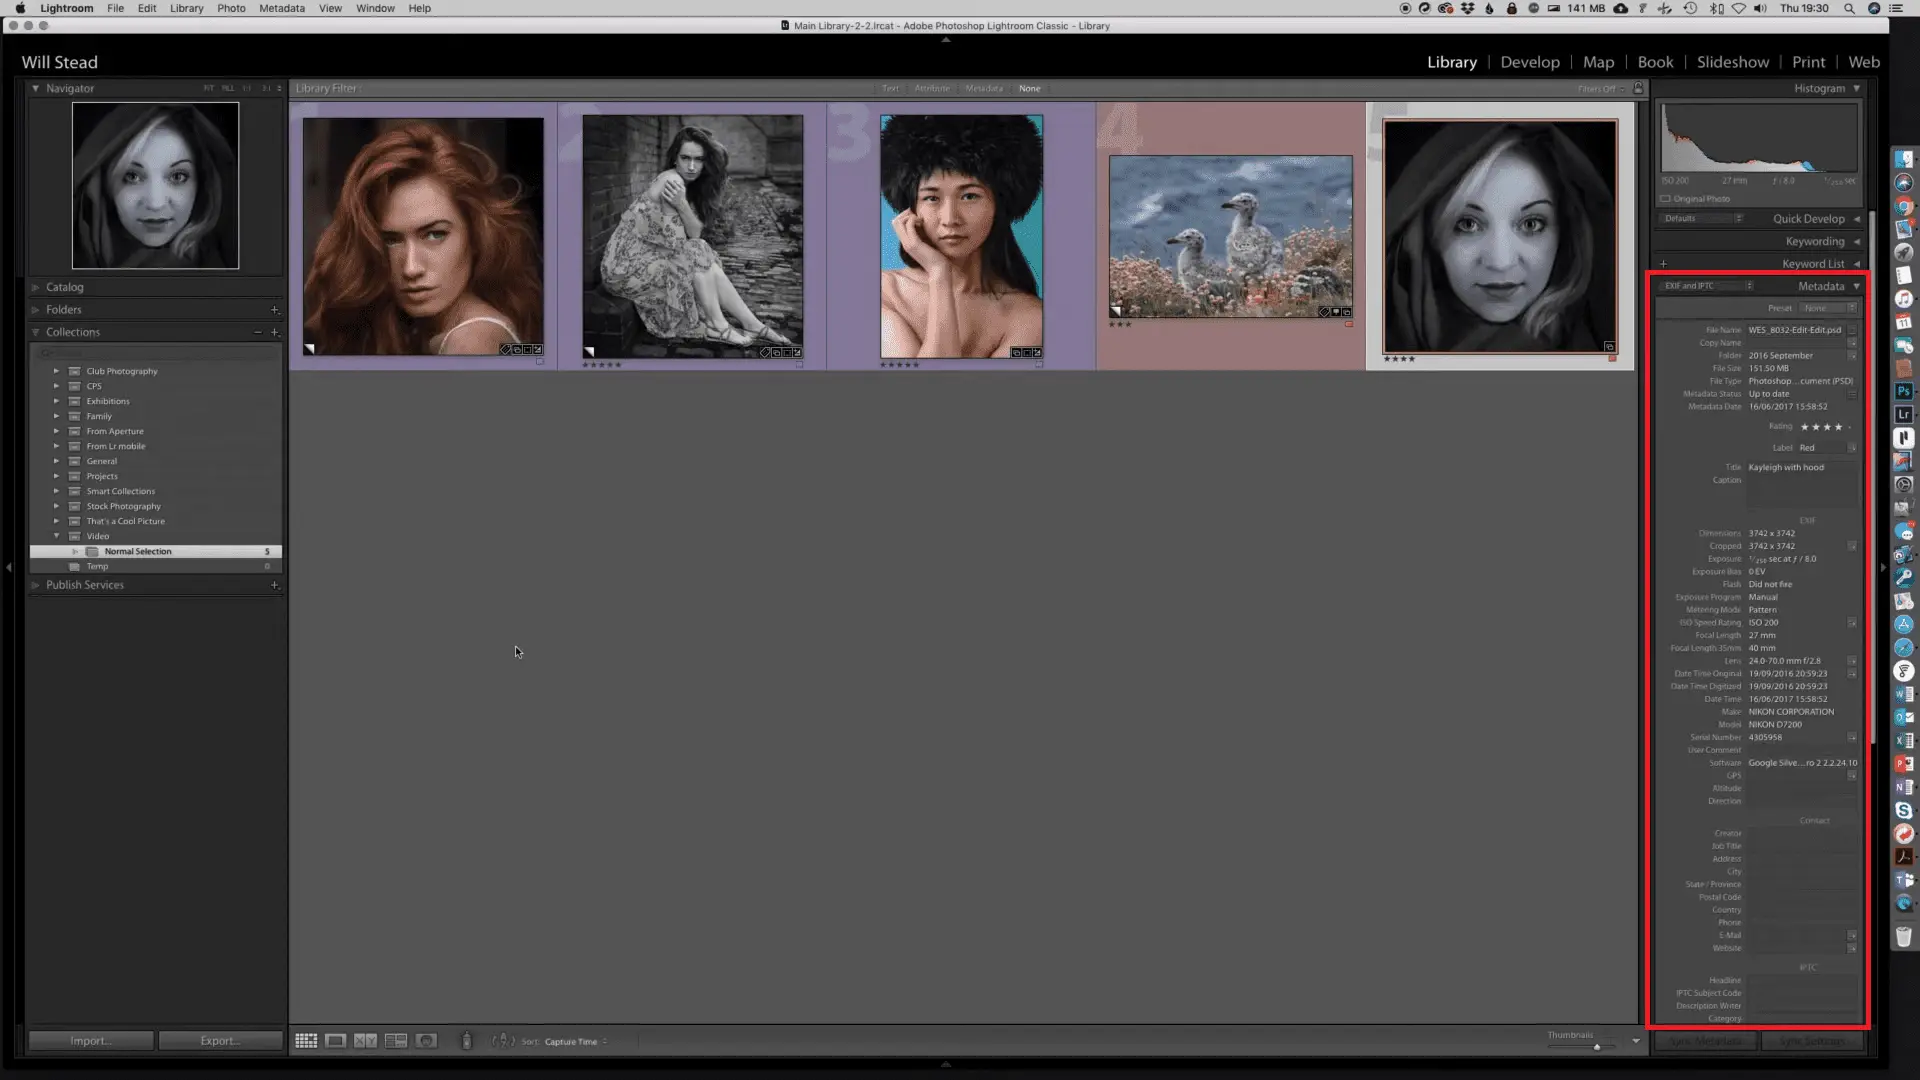
Lightroom is my go-to when I want to manage metadata in bulk. Here’s how I do it:
- Select a photo in the Library view.
- Open the Metadata panel on the right.
- From the dropdown, choose IPTC or EXIF & IPTC to view full metadata fields.
- Click any field to edit it. Want to save time? Use Presets > Edit Presets to create default metadata for future uploads.
- In Adobe Photoshop
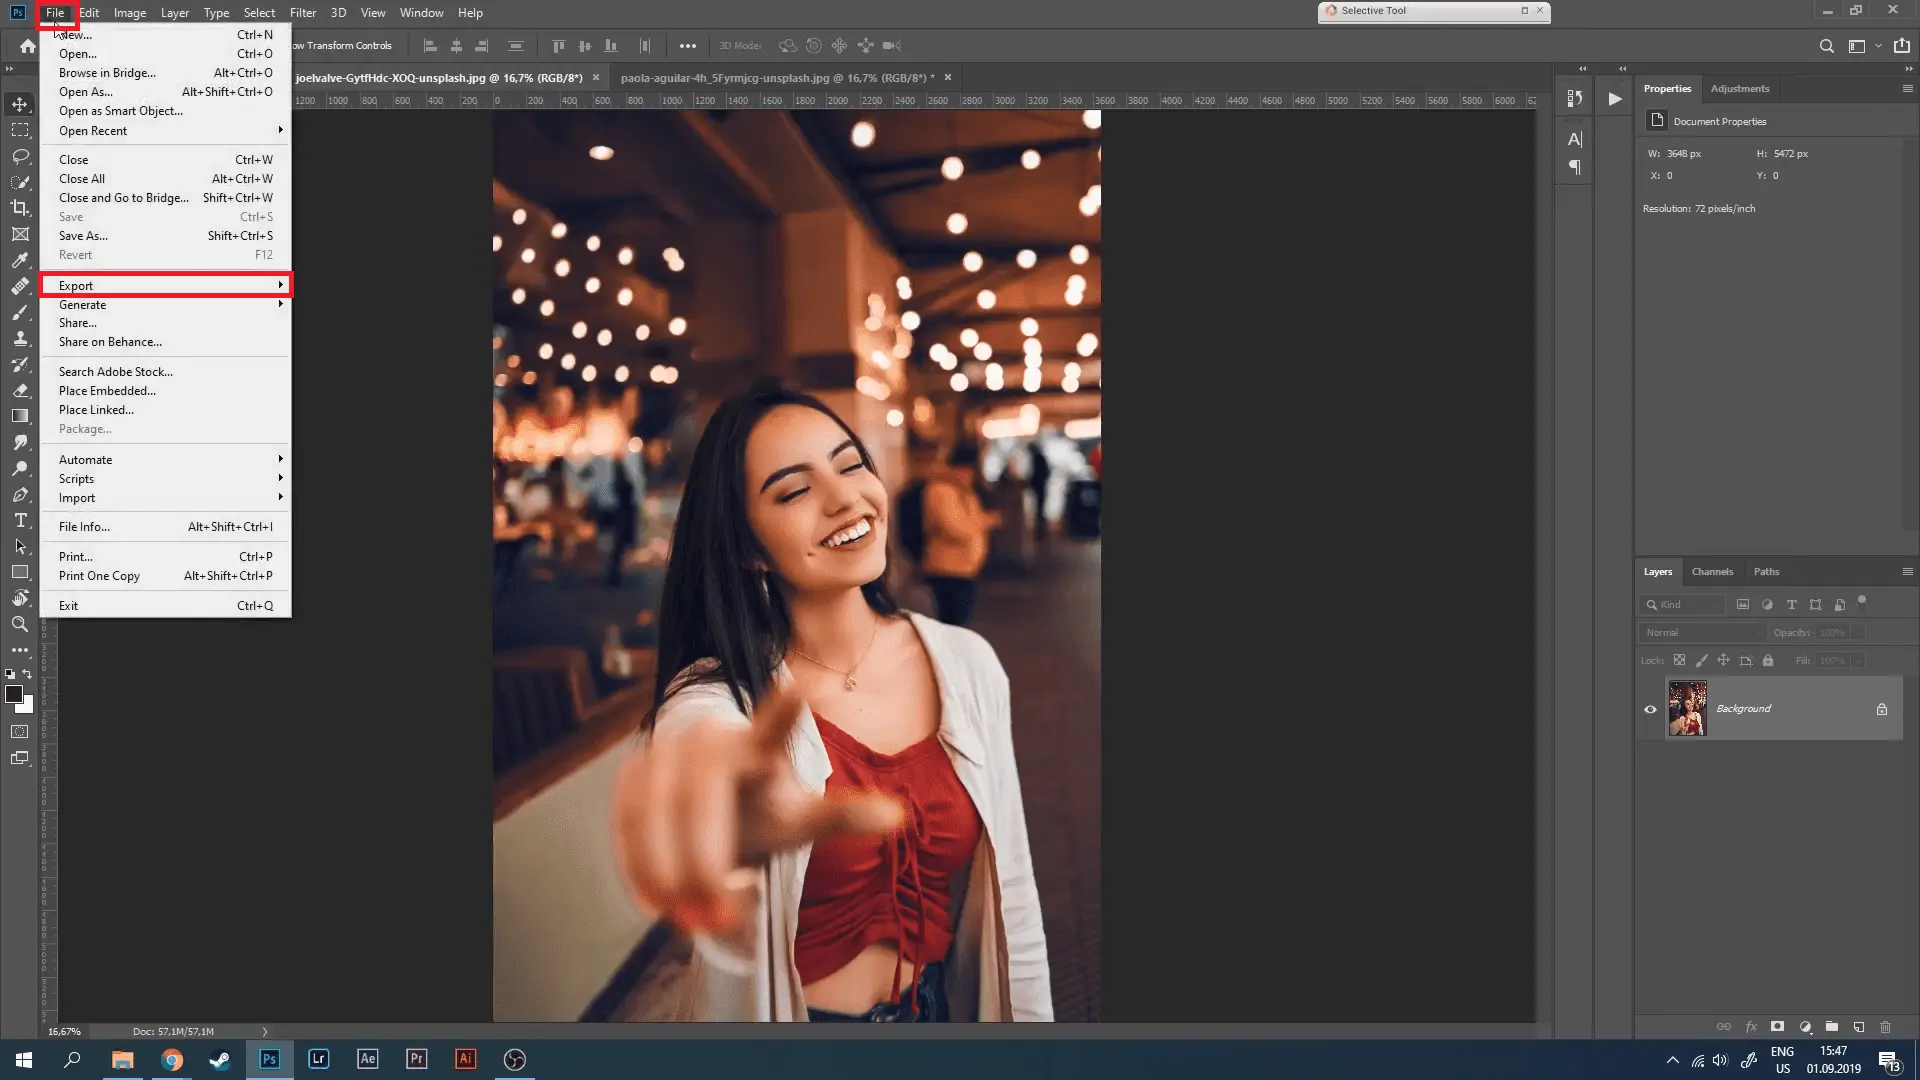
Photoshop has a more roundabout method:
- Go to File > Export > Export As.
- On the right panel, under Metadata, select how much to keep or strip.
- Hit Export to finalize.
Photoshop doesn’t let you dig into IPTC as deeply as Lightroom or Bridge, but it’s useful for cleaning up metadata before posting or sending files..
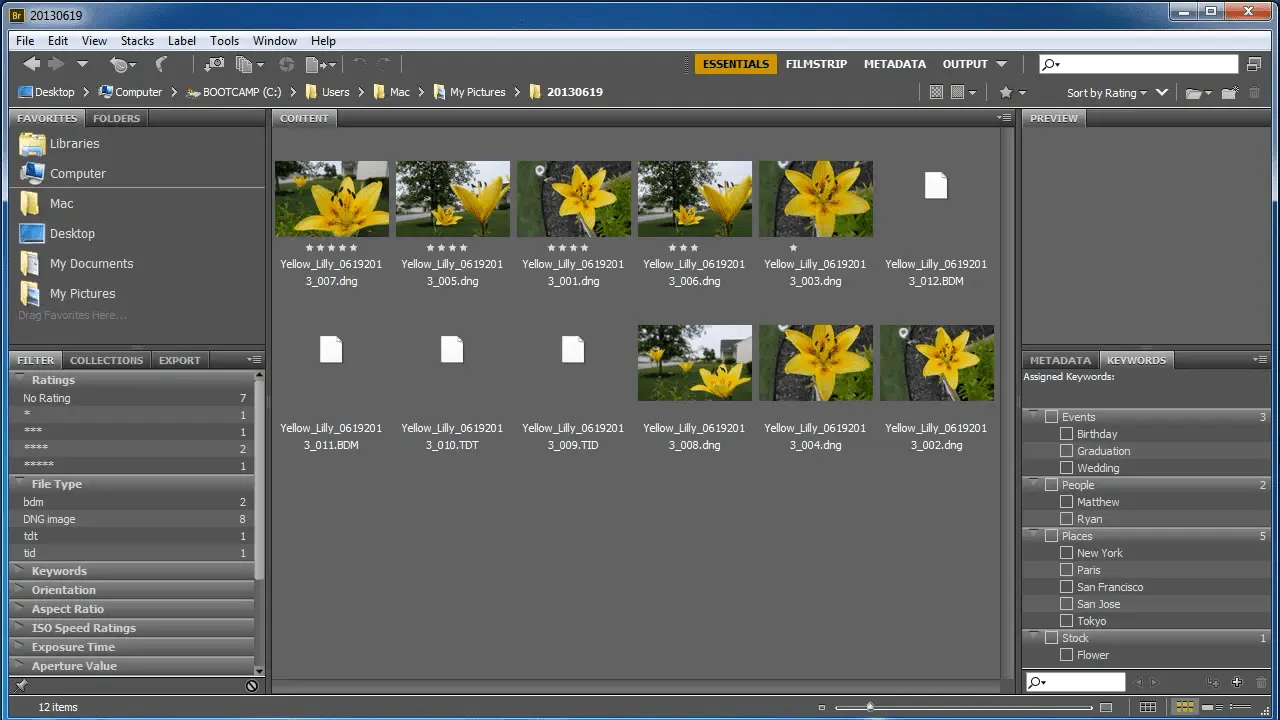
- In Adobe Bridge
Bridge is one of the easiest ways to handle large sets of images:
- Select one or more files.
- Press Ctrl+K or go to Edit > Preferences.
- In the Metadata panel, check the fields you want to show or hide.
- Click directly into any field to edit—or tab through for faster input.
How to Add Metadata on Windows
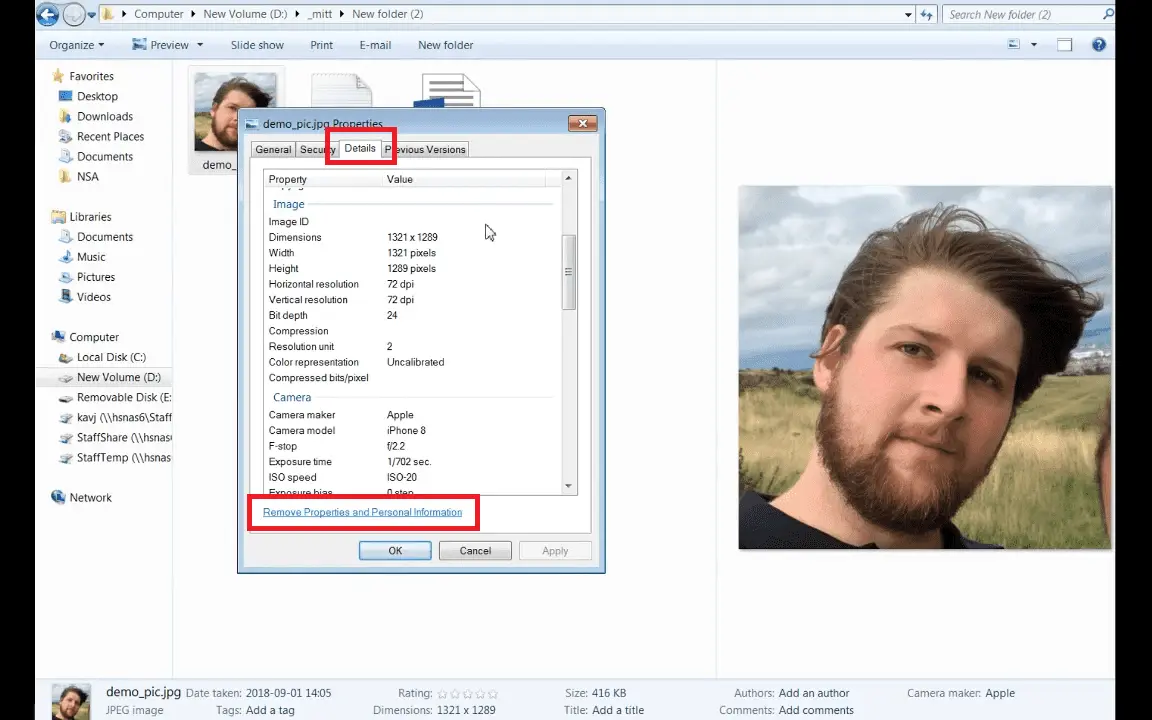
Editing photo metadata on Windows is super simple:
- Right-click the image and choose Properties.
- Go to the Details tab.
- Click any line—like Title, Subject, Tags—to add or update info.
- To remove metadata, scroll to the bottom and click Remove Properties and Personal Information.
How to Add Metadata to Images on Mac
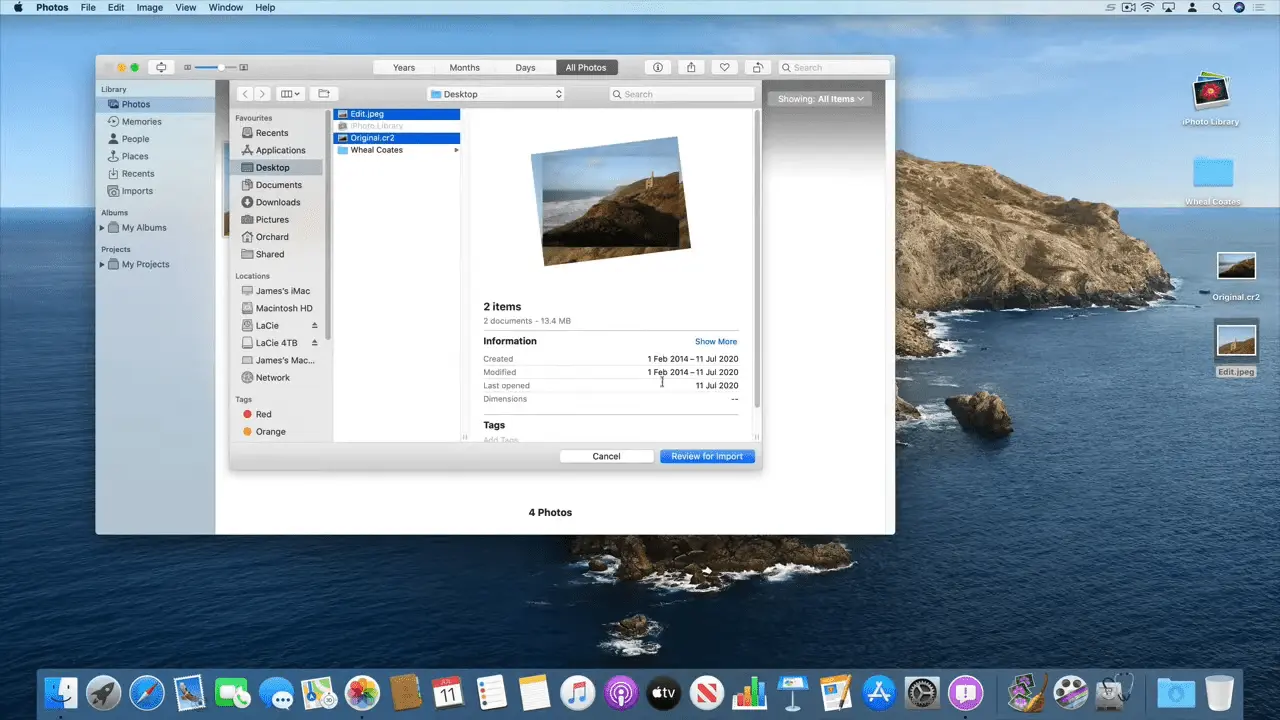
If you're on a Mac, the built-in Photos app is all you need:
- Import the image into the Photos app.
- Open it, then click the Info (ⓘ) icon in the toolbar.
- You can now edit the title, description, and keywords.
Mac doesn’t expose technical fields like EXIF by default, but for basic descriptive edits, this does the trick.
What Metadata Should You Add?
If you're unsure what to fill in, here's a simple checklist I use:
- Author Name – Helps prove ownership.
- Copyright Info – Activate the “Copyrighted” flag and leave a contact in case someone wants to license the image.
- Creation Date – Especially useful when sorting images by timeline.
- Image Description – Think of it like writing a note on the back of a printed photo.
- Keywords & Tags – Makes your image easier to find in search.
- IPTC/Extension Fields – A must if you’re selling or publishing images professionally.
- EXIF Tweaks – You can also update resolution, color depth, and a few technical details with the right tools.
Adding or editing metadata doesn’t have to be complicated. Whether you’re cleaning up image info on your phone, prepping photos for a client, or organizing your personal library, it’s just one more step to keeping your photo life in order.
Using Metadata to Geolocate a Photo
Every now and then, I scroll through my photo library and find a picture that makes me pause and think: Where on earth did I take this? That’s when metadata really comes in handy—specifically the GPS data.
If your camera or phone has location services enabled, it quietly tags each shot with coordinates. So when someone asks how to geolocate a photo or identify location from photo, the answer is often just a few clicks away.
On most devices, here’s what I do:
- On desktop, I open the image’s properties or metadata panel and look for the GPS section. If it shows latitude and longitude, I copy those and drop them into Google Maps. Voilà—instant location.
- On phones, I just swipe up on the image in my Photos app (iOS or Android), and the map preview usually tells me exactly where it was taken.
Of course, not every photo comes with built-in GPS data. If location wasn’t captured, you can still add it manually using tools like Lightroom, GeoSetter, or some mobile apps designed for geotagging. I’ve even added locations afterward to help me sort travel albums or match content with blog posts.
So next time you’re staring at a beach photo wondering which coast it was—check the metadata first. It might just save you from playing geo-detective for hours.
Best Metadata Tools and Editors
Let’s be honest—not all metadata tools are created equal. Some are sleek and modern, others feel like they time-traveled from 2003. I’ve tested quite a few, and these are the metadata editors I keep coming back to:
For Desktop Users:
- Adobe Lightroom – A powerhouse for bulk edits. Great for photographers managing large collections.
- Adobe Bridge – Like Lightroom, but file-focused. Ideal for batch processing.
- ExifTool – The nerdy favorite. Command-line based, but insanely powerful. If you know your way around a terminal, this is the holy grail of metadata tools.
- XnView MP – Lightweight viewer with solid metadata editing built in. Nice balance between power and usability.
- GeoSetter – Perfect for geotagging and updating location info in batches (Windows only, but very handy).
- DAM systems – A a smart choice for teams. They make managing metadata a whole lot easier.
For Mobile Users:
- Photo EXIF Editor (Android) – Clean, simple, and does the job well.
- Exif Metadata (iOS) – Easy to use and lets you tweak a surprising amount of data.
- Metapho (iOS) – Great for viewing and editing metadata in a privacy-friendly way.
Most of these tools let you view, add, or edit photo metadata—from technical settings to IPTC fields and GPS data. Whether you're casually tagging your vacation pics or prepping files for a media library, the right tool makes a big difference.
Comparison of Metadata Editing Tools
| Tool | Platform | Key Features | Best For |
|---|---|---|---|
| Adobe Lightroom | Windows, macOS | Batch editing, IPTC/EXIF support, presets, GPS tagging | Photographers with large image libraries |
| Adobe Bridge | Windows, macOS | Visual file browser, metadata templates, batch processing | Creative professionals managing many assets |
| ExifTool | Windows, macOS, Linux (CLI) | Advanced metadata editing, supports hundreds of formats | Tech-savvy users needing deep control |
| XnView MP | Windows, macOS, Linux | Image viewer, basic metadata editing, user-friendly interface | Users looking for a lightweight free tool |
| Photo EXIF Editor | Android | Edit or remove EXIF data, location tagging | Android users managing on-the-go edits |
| Metapho | iOS | View/edit metadata, privacy controls, clean UI | iPhone users looking for a simple metadata app |
| Pics.io DAM | Web-based (Cloud) | Collaborative metadata editing, IPTC fields, bulk updates, versioning, access control | Teams managing digital assets across departments |
Wrapping It Up: Metadata, Not Magic—but Close
Metadata might not be the flashiest part of photography, but trust me—it’s a silent hero. It helps you keep track of your work, proves ownership, sorts images, and even pinpoints that random mountain shot from 2017.
So whether you're learning how to geolocate a photo, choosing your favorite metadata editor, or just trying to figure out how to edit metadata without pulling your hair out, the bottom line is: once you get the hang of it, metadata becomes your best backstage assistant.
Add it, edit it, own it—and let your photos tell their full story, right down to the last detail.
Did you enjoy this article? Give Pics.io a try — or book a demo with us, and we'll be happy to answer any of your questions.


